Evenicle is a classic Japanese RPG, and many players encounter various challenges during gameplay. This guide provides a detailed full-chapter walkthrough for Evenicle, including skill chest locations, combat tips, character development routes, and other core content. The guide is suitable for both speedrunners and completionists, with detailed level recommendations and combat strategies for each chapter.
Before starting the game, there are two important points to note. First, Evenicle is not a pure love game—the protagonist will be NTRed and actively take back his partner. Players who are sensitive to this should choose carefully. Second, after entering Chapter 5, the game's tone shifts from lighthearted and cheerful to dark and bloody. Players with weaker psychological resilience should prepare themselves mentally.

Table of Contents
Evenicle Attributes Introduction
Before starting the game, players need to understand Evenicle's core attribute system. These attributes directly affect combat performance and character development direction.
1. Attack Power & Magic Power
Attack Power & Magic Power determine how much damage a character deals. In the game, these are mainly increased through leveling up. Weapons in shops are either too expensive or provide too little stat boost. Except for endgame equipment, there's no need to buy other weapons.
2. Defense & Magic Resistance
Defense & Magic Resistance determine how much damage a character mitigates. In the game, these are mainly increased through leveling up, and shop weapons have terrible cost-performance. Except for endgame gear, there's no need to waste money on other equipment.
3. Hit Rate & Evasion Rate
Hit Rate is the probability of successfully hitting an enemy, while Evasion Rate is the probability of dodging enemy attacks. If a character has 100% Hit Rate and the enemy has 30% Evasion Rate, the actual hit rate is 70%. Special note: All magic attacks and sure-hit skills in the game ignore evasion and hit directly. Even skills with 100% hit rate can be blocked by enemy tanks.
4. Experience Rate
Experience Rate determines the percentage of bonus experience a character gains. If the rate is 110%, the character gains 10% more experience after battles. After entering Chapter 6, you can capture Snow Girls as items to boost experience rate—essential for players who want to grind levels.
5. Stun Rate
Stun Rate is the probability of stunning enemies and preventing them from acting. If the stun rate is 50% and the enemy's resistance is 20%, the actual stun chance is 30%. Low-level players don't need to consider these flashy stats, and high-level players don't need to specialize in this either.
6. Agility
Agility, also called action speed—higher agility means characters act earlier in the turn order. Low-level players don't need to worry about this stat, and high-level players don't need to deliberately stack it.
7. Resistance Rate
Resistance Rate is the probability of resisting negative statuses, including stun, petrification, poison, etc. If resistance is 50% and the enemy's attack has an 80% chance to apply a negative status, the chance of being affected is 30%. After completing the side quest "Island Elder," you can buy the Resistance Crown at the island shop. The Resistance Crown is a must-buy item in both Evenicle 1 and 2, because getting stunned by a boss at a critical moment and being unable to attack is extremely frustrating.
Chapter 1: Eden Kingdom Walkthrough

Chapter 1 is the starting point of the game, mainly teaching basic operations and combat systems. Players need to fight monsters around Abel City to collect 100G as starting funds. Then enter Abel City, go to the church once to trigger the quest outside the city.
Next, go to the exclamation mark at the upper right of Abel City to complete the quest, then return to Abel City to turn it in. After that, go to the exclamation mark at the upper left of Abel City, complete it, and return to Abel City again. It's recommended to train to level 5 during this stage, then follow the road to the Outlaw Cave at the lower left of Abel City.
After entering the Outlaw Cave, go to the room at the lower left to trigger the plot, then go to the iron door at the upper left to enter and start a story battle. This battle is recommended at LV5, Ramius LV5 will temporarily join the party. After the battle, return to Abel City, go to the coast at the lower right to trigger the plot, then return to Abel City again. After the plot, Ramius LV5 officially joins the party.
Then go to Baroron Fortress, follow the road to Starion City. Go to the Happiness Flower Field at the lower right of Starion City and defeat the Super Gecko Child. There are three battle exclamation marks in the flower field—go to the top one to trigger the boss battle, recommended LV5. Return to Starion City to turn in the quest, then go to the church and your home.
Next, head to Eden City. The bridge at the upper left of Starion City is currently impassable—you can only take the mountain road on the right to enter the Fog Labyrinth. In the Fog Labyrinth, escape from battles as quickly as possible. After leaving the labyrinth, follow the road to Eden City. After arriving in Eden City, enter the Fog Labyrinth again. In the labyrinth, go up, then right, then down to the exclamation mark to automatically leave the Fog Labyrinth.
Then go to the exclamation mark at the lower left of the Happiness Flower Field to trigger the plot, return to the Fog Labyrinth, go left, up, right, down to the exclamation mark for a story battle. This battle is recommended at LV7—the enemies are ghosts, and physical attacks are very ineffective. You can use Aster's Bilibili skill to deal with them. After the battle, the Fog Labyrinth disappears. Return to Eden to turn in the quest.
After that, go to the previous Outlaw Cave—you can now take the bridge below Eden City. Go to the old location in the Outlaw Cave for a story battle, recommended LV8, Riche LV8 temporarily joins. The combat strategy is to first use magic to eliminate the two bandits in the back, then focus fire on the lizard—physical attacks work better against lizards. Return to your home to trigger the plot, Riche LV8 officially joins the party.
After going to Eden City, Ashval LV42 and Barro LV42 temporarily join, then go to Baroron Fortress. After entering the fortress, both Barro and Ashval will leave the party and cannot be used for story battles. There will be two non-consecutive story battles at Baroron Fortress, recommended LV9—the enemies are several outlaws.
Then go to the national border bridge to the right of Starion City for a story battle, recommended LV10, buy three healing potions in advance. Riche's all-party fire magic is extremely effective—first clear the small fry, then focus on the boss. After the battle, go to Eden City, return home, and Chapter 1 ends.
Chapter 1 Skill Chest Locations
Chapter 1 has 8 skill chests, located as follows:
1. Bilibili (Aster)
Located in the chest at the upper left of Abel City—this is Aster's important magic attack skill in the early game.
2. Information Disclosure (Aster)
Located in the chest to the left of Baroron Fortress—can view enemy information.
3. Mapping (Aster)
Located in the chest in the forest below Baroron Fortress.
4. Full Power Slash (Aster)
Located in the chest in the second room at the entrance of the Outlaw Cave—this is the main output skill in the early game.
5. Rising Slash (Aster)
Located in the chest in the forest above Starion City.
6. Experience Talent (Ramius)
Located in the chest at the upper right of Eden City—increases experience gain efficiency.
7. Gun Combo (Ramius)
Located in the chest to the left of Eden Port.
8. Capture (Ramius)
Located in the chest in the left passage of the ruins to the left of Eden Port—can capture monsters.
Chapter 2: Lancelot Kingdom Walkthrough
Chapter 2 opens the new Lancelot Kingdom, where players need to complete a series of quests and recruit new party members. First go to the Eastern Bridge, cross it and follow the road to Lancelot City, go to the exclamation mark at the upper right to trigger the plot, then return to Lancelot City.
Next, go in order to Eccott City at the upper left of Lancelot City, Rainel City at the lower right of Lancelot City, and Safir City to the left of Rainel City. After exploring these cities, return to Lancelot City and go to Camelot at the lower right. In Camelot, defeat 5 orbs, recommended LV12—Aster's Strong Attack can easily handle this. After winning, you get the Teleport Magic skill, which allows travel between different cities.
After returning to Lancelot City, go to the exclamation mark at the central island of Guinevere Lake at the upper right to trigger the plot. After the plot, Riche and Ramius leave the party, and Aster goes to Rainel City alone. Note that the protagonist cannot use Teleport Magic at this time—be careful not to get killed by wild monsters while alone.
Return to the central island of Guinevere Lake—Riche and Ramius rejoin, and Tio joins the party. Tio has no attack ability, but if killed by wild monsters, it's game over—you must protect him at all costs. Go in order to Rainel City, Eccott City, and Safir City, noting that each city has one or two consecutive story battles, recommended LV17—Tio absolutely cannot be killed by wild monsters.
Afterward, go through the bridge above Eccott City to Pancage City. Upon arrival at Pancage City, the protagonist engages in a story battle, recommended LV17—enemy is Kukrilla, who can instantly kill party members randomly. If you're lucky, you won't be instantly killed; if unlucky, reload and try again. After the battle, return to Lancelot City, Tio leaves the party.
Then buy a few healing potions—you can't use them before climbing to the mountain top for plot dialogue. Go to the national border mountain at the upper right of Guinevere Lake, pass through the winding mountain road to reach the very top. After dialogue, Riche and Ramius leave the party, and Aster goes alone to the hot spring below. Healing potions save your life here—getting ambushed by wild monsters while running around alone is frustrating.
After reaching the hot spring at the lower right, Riche and Ramius rejoin, then return to Lancelot City. Kukrilla LV15 joins the party. Buy Desert Shoes at the item shop in Lancelot City, then you can cross the desert to the left of Eccott City to reach the Arthur City Ruins. After entering the city, there are three consecutive waves of story battles—it's recommended to grind to LV20 outside before entering.
Go to the water purification facility at the lower right of Eccott City—go straight down, you can skip the battles on both sides. In the corridor at the very back of the facility, learn the cause of death of the investigator, then engage in a story battle, recommended LV20—enemies are a group of outlaw soldiers. After defeating the corridor enemies, enter the innermost room for an office story battle—enemies are three assassins, recommended LV20. Though their damage isn't high, they can randomly instant-kill party members—if unlucky, reload multiple times.
Grind to LV23 in Lancelot City, then go to Arthur City Ruins. After entering, there are two consecutive story battles—party HP is automatically restored after the battles, then the boss battle begins. Recommended LV23—Roosevelt has become the Jealousy Monster. His attack power isn't high, but when his HP drops to half, he starts charging. If you can't defeat him before he finishes charging, he'll heal to full HP on his turn. It's recommended to level up and buy a few BP potions before attempting.
After the battle, go to Lancelot City, then to Eden City, return home, and Chapter 2 ends.
Chapter 2 Skill Chest Locations
Chapter 2 has 10 skill chests, located as follows:
1. Light Arrow (Riche)
Located in the chest at the lower left of Lancelot City—light attribute magic attack.
2. Ice Arrow (Riche)
Located in the chest at the lower left of Eccott City—ice attribute magic attack.
3. Early Guard (Ramius)
Located in the chest on the right path in the ruins at the upper right of Rainel City.
4. Speed Boost (Ramius)
Located in the chest on the hillside to the left of Rainel City.
5. Train Slash (Aster)
Located in the chest to the left of Pancage City.
6. Fire Master (Riche)
Located in the chest in the first alley on the right in the Hani ruins above Eccott City.
7. Ice Master (Riche)
Located in the chest at the very back of the Hani ruins above Eccott City.
8. Light Master (Riche)
Located in the chest in the third alley on the right in the Hani ruins above Eccott City.
9. Persistence (Kukrilla)
Located in the chest at the upper left of Arthur City Ruins.
10. Magic Power Boost (Aster)
Located in the chest at the lower left of the Arthur City desert.
Chapter 3: Elgicod Kingdom Walkthrough
Chapter 3 opens Elgicod Kingdom, requiring players to reach level 20 or above to proceed smoothly. Stay at any inn to trigger Camelot Chapter 3 trial. Go to Camelot for battle—capture or wait for the female monster to escape 5 times to obtain the skill Eight Dust.
Go to Kas's house at the national border mountain at the upper right of Lancelot City, engage in a story battle at the door, recommended LV23—enemies are three knights. After the battle, go right to Elgicod City. Go to the exclamation mark at the right side of Elgicod City to trigger the plot, then return to Elgicod City. Afterward, go to Wilfont City to the right of Elgicod City, then to Hundred-Yen City at the lower left of Wilfont.
Go to Kara Forest below Hundred-Yen City—at this point, the northern passage in Kara Forest is impassable; forcing your way through will result in endless battles. You can only detour left and enter Kara Forest West from the left side. Aster needs to equip the sure-hit skill, as there will be many high-speed enemies ahead—except for magic attacks and sure-hit skills, everything else will likely miss.
Pass through Kara Forest West to reach Kara Village, advance right to Kara Forest East, reach the exclamation mark for a story battle, recommended LV25—enemies are three gibbons. After the battle, go to the exclamation mark above the Spring of Truth, then continue investigating the exclamation mark on the right. After seeing Kas at the upper right of the map, return to Hundred-Yen City.
Go to Elgicod City, then to Kara Village. After the plot, the northern road from Kara Village is unlocked—you no longer need to detour from the left and can go directly from Hundred-Yen City down to Kara Village. Go to Elgicod City, then to Machimomo City above Wilfont City. Take the road left from Machimomo City, then go to the ruins at the upper left—be careful not to step on traps inside the ruins. Go to the exclamation mark at the altar in the ruins to trigger the plot.
Go to the hot spring at the national border mountain to recover, then go to Elgicod City. Go directly from the road below Hundred-Yen City to Kara Village. Go to Lancelot City, to Arthur City, to Eden's Fog Labyrinth for a story battle—you need to eliminate three monsters simultaneously, or new monsters will join the fight.
After the battle, go to Lancelot City, to Elgicod City, to Machimomo City. Both the upper and right roads from Machimomo City are now open—take the upper road from Machimomo City. Engage in a story battle on the mountainside, recommended LV27—enemies are a group of Hani, you can have Aster equip Hani Destroy. Then reach the mountaintop, go to Wilfont City, then to Kara Village.
Go to the exclamation mark in Kara Forest East—after the plot, Kas LV30 joins the party. Go to Elgicod City, take the upper road from Machimomo City to the mountaintop—after the plot, the hot air balloon is unlocked, ride it into the cave. Engage in a story battle inside the Monster Nest, recommended LV30—enemies are a group of Oz.
Then go directly to the second cave-in trap, fall down to fight the Furnace Pot, recommended LV30—use long-range attacks to kill the Furnace Pot, then eliminate other monsters. Before defeating the Furnace Pot, the path in Monster Nest is blocked, and you'll get stuck in endless battles that force you to retreat.
Walk to the lower left of the cave, heal at the spring nearby, then engage in the boss battle. Recommended LV29, Rocinante has become the Greed Monster. Attack power isn't high, but weakness is light attribute attacks. At first, it will steal money to heal itself. After the player's money is depleted, it will steal party members' HP to heal itself. Go to Eden City, return home, Chapter 3 ends.
Chapter 3 Skill Chest Locations
Chapter 3 has 16 skill chests, located as follows:
1. Assassination (Kukrilla)
Located in the chest at the lower right of Wilfont City.
2. Heal 1 (Riche)
Located in the chest on the right side of the nameless shrine at the lower right of Hundred-Yen City.
3. Mercy (Kukrilla)
Located in the chest within Kara Forest West.
4. Light Burst (Riche)
Located in the chest at the lower left of Kara Village.
5. Full Power Slash改 (Aster)
Located in the chest next to the Spring of Truth in Kara Forest East.
6. Poison Inflict (Kukrilla)
Located in the chest at the upper left of Kara Forest East map.
7. Hani Destroy (Aster)
Located in the chest on the road at the lower left of Machimomo City.
8. Surprise Prevention (Kukrilla)
Located in the chest on the road to the right of Machimomo City.
9. Staff Strike (Riche)
Located in the chest on the road above Machimomo City.
10. Resistance Boost (Ramius)
Located in the chest in the ruins at the upper left of Machimomo City—requires Kas to join before you can open the door and pick it up.
11. Capture Technique (Ramius)
Located in the chest in the valley reached by hot air balloon after climbing the stone steps to the platform on the left of Hundred-Yen City—requires Kas to join before you can pick it up.
12. S Attack (Ramius)
Located in the chest on the small island reached by hot air balloon to the left of Pancage City—requires Kas to join before you can pick it up.
13. Experience Talent (Riche)
Located in the chest in another valley reached by hot air balloon from the valley to the right of Pancage City—you need to defeat a blocking big monster, requires Kas to join before you can pick it up.
14. Gun Combo改 (Ramius)
Located in the chest at the first cave-in trap in Monster Nest.
15. Lightning Storm (Aster)
Located in the chest at the second cave-in trap in Monster Nest.
16. Counter (Kukrilla)
Located in the chest at the third cave-in trap in Monster Nest.
Chapter 4: Humpdy Kingdom Walkthrough
Chapter 4 requires players to reach level 30 or above. Stay at any inn to trigger Camelot Chapter 4 trial. Buy 4 BP potions and 4 healing potions, go to Camelot for battle. Use a skill with character portrait to defeat the last monster in battle, recommended LV32—Aster's Eight Dust, Full Power Slash, and Ramius's Gun Combo are all good choices. Repeat 5 times to get the Attribute Sword. The trial's wild monsters deal high damage, and you can't exit the trial midway. To avoid running out of HP halfway, you need to buy 4 healing potions and 4 BP potions in advance.
Take a balloon from the lower right of Wilfont City to Zampdi Island, follow the road to Zampdi City. Then take a hot air balloon at the upper right of Zampdi Island to Humpdy Island for a story battle, recommended LV32—enemy is a big jellyfish, weak to fire. Go to Humpdy City below, take a hot air balloon from the upper right of Humpdy Island to Udon Island. Go down for a story battle, recommended LV34—enemies are a group of outlaws.
Return to Humpdy City, equip Aster with thunder magic—there will be many tanks ahead, thunder magic will be useful. Engage in a story battle on the hillside below, recommended LV34—enemies are two tanks. After returning to Humpdy City, go to the exclamation mark on the hillside below again to reveal the undersea tunnel entrance. Enter the tunnel, investigate the exclamation mark, and pick up the skill Mechanical Destruction in the small room inside the undersea tunnel—equip it on Kas, it's essential for the upcoming series of battles. Engage in a story battle, recommended LV34—enemies are Device Soldiers.
Exit the undersea tunnel to the Dwarf Village below—there's a story battle when entering the village, recommended LV35—Kas uses Mechanical Destruction. Go to Humpdy City, then to the ruins north of Humpdy City. There are many battle exclamation marks inside, but only the large room below the battle exclamation mark with the golden knight allows you to meet Elimo—other battles can be skipped. Then continue left through the labyrinth, trigger the plot at the altar, then go to the room below for a story battle, recommended LV35—weak to fire, bring two healing potions to wear it down.
Go to Humpdy City, trigger the plot at the exclamation mark above Udon Island. Return to Humpdy City, go to the Dwarf Village, go to Kara Village—after the plot, you get the Logging skill. Go to Kara Forest South, there are multiple exclamation marks—any location works. Ensure you have 3 healing potions in your inventory, return to the Dwarf Village for a story battle, recommended LV36—enemies are a group of Device Soldiers, Kas uses Mechanical Destruction. Although the intel says Aster's thunder magic is useful, in practice Strong Attack deals higher damage.
Afterward, you can ride ships from port towns. Sail from Humpdy City to Merankri Island at the lower left, and from Humpdy City to Klopty Island at the upper left. Ensure you have 3 healing potions in your inventory, sail to Hani Island—note there are no shops on Hani Island. Go to Hani Junk Mountain, the first wave of battle is against a Double Hani, the second wave is against two Double Hani, recommended LV36—Aster equips Hani Destroy, Kas equips Cancel.
Go to the exclamation mark at Hani Junk Mountain, then go to Haitengsen Island at the lower right of Humpdy City. Immediately after the plot at the upper right of Haitengsen Island, engage in a story battle, recommended LV36—armored enemy, weak to ice. Enter the Angle Sugar Ruins, go straight down for a story battle—investigate the mechanism first to open the door, investigate again to open it once more, investigate a third time to open it again. Remember to pick up Riche's skill F Radiation in the Angle Sugar Ruins—this skill is essential for this chapter's boss. Then go to the innermost area for a story battle, recommended LV38—a group of Blue Horn Whales, weak to ice.
Go to Klopty City, to Humpdy City, then sail from Rainel City in Lancelot Kingdom to Fish Island. Go to the ruins at the southern part of Fish Island for a story battle—enemy is a flying dragon, flying type weak to ice. Go to the altar at the lower right of the labyrinth, then to the dark room at the upper right of the altar, then return to the village.
Buy 4 BP potions and 4 healing potions in advance, go to Humpdy City for the boss battle. Recommended LV40, Zaba has become the Gluttony Monster. This boss's weakness is fire attribute attacks, and it will randomly eat people to recover 8000 HP. Don't clear the small fry—it will prioritize eating them. Once the small fry are gone, it will eat party members, and if it eats a party member, it's game over. Riche must bring fire attribute skills and keep using F Radiation continuously while constantly using healing potions, otherwise you can't win. Give Aster's Attribute Sword to Kukrilla, and have Kukrilla bring Poison Inflict. After the battle, go to Eden City, return home, Chapter 4 ends.
Chapter 4 Skill Chest Locations
Chapter 4 has 19 skill chests, located as follows:
1. Cancel (Kas)
Located in the chest behind the purple fog at the upper right of Zampdi Island.
2. HP Boost (Kas)
Located in the chest above Humpdy City.
3. Dark Punch (Kulikura)
Located in the chest at the upper left of Humpdy City.
4. Resurrection (Riche)
Located in the chest above Udon Island.
5. Power Up (Kulikura)
Located in the chest below the entrance of the Dwarf Village.
6. Female Thrust (Ramius)
Located in the chest in the room above the altar in the Dragon's Food Storage.
7. Volley Fire (Kas)
Located in the chest reached by boat from Pancage City to the left island of Eden.
8. Armor Break Fist (Kukrilla)
Located in the chest at the upper right of Merankri Island.
9. Shield Counter (Ramius)
Located in the chest on the right side of the ruins at the upper left of Merankri Island.
10. Long-range Assault改 (Ramius)
Located in the chest at the upper left of Klopty Island.
11. Speed Boost (Aster)
Located in the chest to the right of Hani Village.
12. Heal 2 (Riche)
Located in the chest above Hani Village.
13. Defense Technique改 (Ramius)
Located in the chest in the Hani ruins at the upper right corner of Hani Village.
14. Speed Boost (Kukrilla)
Located in the chest in the Hani ruins at the upper right corner of Hani Village.
15. Emergency Treatment (Kas)
Located in the chest at the upper left of Haitengsen Island.
16. Gun Barrage (Ramius)
Located in the chest in the Angle Sugar Ruins.
17. Thunder改 (Aster)
Located in the chest in the Angle Sugar Ruins.
18. Strong Attack改 (Aster)
Located in the chest at the lower left of Fish Island.
19. Calm Slice (Aster)
Located in the chest at the upper left of the ruins on Fish Island.
Chapter 5: Hamlet Kingdom Walkthrough
Chapter 5 is the turning point where the game's style changes—from here on, the game becomes dark and bloody. Go to Eden City, sail from Humpdy City to the church at the south of Merankri Island at the lower left corner. Afterward, you cannot use Teleport Magic or hot air balloons. Go to Kadomatsu below Haitengsen Island, to Kagamimochi above Udon Island, to the abacus at the upper left of Klopty Island. Buy a few healing potions for backup.
Sail from Klopty Island, engage in a story battle on the sea at the upper left, recommended LV42—entire party is weak to fire, Captain Vanilla and a group of small monsters. Since you can't teleport back to town to heal now, remember to bring healing potions, otherwise being in a weakened state after battle and getting killed by wild monsters is frustrating. After the battle, go to Hamlet City at the upper left—Teleport Magic is now usable.
Go to the exclamation mark next to Horatio City to the left of Hamlet City, return to Hamlet City. Go to the center of the Poison Labyrinth above to trigger a story battle, recommended LV43—5 zombies × 3 consecutive battles. Take the right road to the junction at the upper right of the labyrinth with the purple forest, go to Hamlet City, return home.
Go to Rainel City, temporarily disable Kukrilla's small fry exclusion, defeat a Slime波波 around the city. Go to Safir City for a story battle, recommended LV43—a huge Slime波波, weak to light. Return to the junction at the upper right of the labyrinth with the purple forest—after the plot, pass through the forest to Osric City. Go to Osric City, to the bulletin board, to the field, to the well at the upper left, to the square. Go to the exclamation mark at the center of the Poison Labyrinth, go to Hamlet City.
Sail from North Port to the Salt Temple on the right, go to Horatio City. Go to the second herb field at the upper left of the Poison Labyrinth, touch the blocking vines. Go to the field on the left, get Cholera Grass at the lower left. Then get herbicide from the well near the entrance. Herbicide can eliminate most vines, but there's one poisonous vine that cannot be eliminated.
Go to the cabin at the upper left for a story battle, recommended LV46—enemies are five plates. Return to the exclamation mark by the well—after the plot, get Herbicide Spread. After Kas equips the Herbicide Spread skill, fight the poisonous vine—only Kas's Herbicide Spread can deal effective damage, other attacks are basically ineffective. After killing the poisonous vine, go inward to the exclamation mark above. Return to Horatio City, go to Hamlet City, return to Horatio City again. Go to Humpdy City, to Horatio City, to Hamlet City.
Enter Osric City, enter Assassin Academy. Engage in a story battle, recommended LV46—enemies are a group of zombies, weak to fire. You need to activate three devices to open the path at the back of the corridor: go to the exclamation mark in the room left of the pool, to the exclamation mark in the shooting training room (there's a story battle at the door, recommended LV46—enemies are a group of zombies, weak to fire), and to the shelf at the upper left of the medicine storage (this one has no exclamation mark prompt). There are battle exclamation marks in the rooms you pass through, but you can skip them. Trigger the plot in the innermost headmaster's office, return to Horatio City.
Go to the fourth room in Camelot—the first three rooms can't be entered if not unlocked. Go to Hamlet City, go to the Salt Temple to the right of North Port. Engage in a story battle—halfway through, the protagonist will flee. Fight monster salt balls in the labyrinth, then return to the giant slug to use Weaken. Note that after killing each salt ball, you must return to the slug to use Weaken before you can fight the next salt ball. Weakening 4 times is enough—the giant slug becomes a small crispy skin, easily killed.
Enter the inner room for a story battle, recommended LV45—Headmaster alone, can randomly instant-kill party members, extremely disgusting. Go to the bridge in the Poison Labyrinth for the boss battle—buy healing potions and BP potions. Recommended LV48, Ophelia has become the Lust Monster. When its HP drops to a certain level, it will split and attack, but shares one HP bar. Because it has its back to us, you can't see its front. After the battle, go to Hamlet City, to Eden City, return home, Chapter 5 ends.
Chapter 5 Skill Chest Locations
Chapter 5 has 20 skill chests, located as follows:
1. Magic Shockwave (Riche)
Located in the chest at the upper right of Hamlet City.
2. Super Ice Master (Riche)
Located in the chest on the left side of Skull Island at the upper right of the world map.
3. Poison Resistance (Kukrila)
Located in the chest near the entrance of the Poison Labyrinth.
4. Sweeping Leg Gun改 (Ramius)
Located in the chest on the left side of the Poison Labyrinth periphery.
5. Magic Defense Art (Ramius)
Located in the chest on the right side of the ruins in a particularly remote place at the lower left after exiting the Poison Labyrinth.
6. Train Slash改 (Aster)
Located in the chest at the lower right of the Poison Labyrinth.
7. BP Welfare (Kas)
Located in the chest at the upper left of Osric City.
8. HP Boost (Aster)
Located in the chest at the lower right of North Port.
9. Treasure Treasure (Kukrilla)
Located in the chest at the upper left of North Port.
10. Physical Defense Art (Ramius)
Located in the chest on the left side of the ruins at the lower left of North Port.
11. Money Money (Kas)
Located in the chest at the lower left of the herb field—requires killing blocking vines.
12. Magic Barrier (Riche)
Located in the chest at the upper right of the herb field—requires killing blocking vines.
13. Right Hook (Kukrilla)
Located in the chest at the upper left of the herb field—requires killing blocking vines.
14. Information Disclosure (Kas)
Located in the chest at the upper right of the herb field—requires killing blocking vines after equipping Herbicide Spread.
15. Hellfire Flame Break (Riche)
Located in the chest to the left of the pool in Assassin Academy.
16. Combat Trap (Kukrila)
Located in the chest in the headmaster's office of Assassin Academy.
17. Assassination改 (Kukrila)
Located in the chest at the lower right outside Salt Temple.
18. Stun Rate Boost (Aster)
Located in the chest on the left side of the Salt Temple island.
19. Gun Combo改改 (Ramius)
Located in the chest at the upper left inside Salt Temple.
20. All Cancel (Kas)
Located in the chest at the lower right inside Salt Temple.
Chapter 6: Saint Tonal Kingdom Walkthrough
Chapter 6 requires players to reach level 49 or above to proceed smoothly. Go to the fourth room in Camelot, talk to Ku to get Heart Steal. Go to Horatio City, then to the bridge above Horatio City, to Hamlet City, to your home, to the Dwarf Village, to Elgicod City.
Go to the Miguel Mountain Cave at the upper right of Machimomo—this is a new map. Trigger a story battle at the lower left of the cave, recommended LV49—enemies are three traps and two turtles. Buy healing potions, sail from Hamlet to the southern coast of Saint Tonal, trigger a story battle, recommended LV49—enemy is a big jellyfish. After the battle, you're already low on HP, but there's another story battle upon landing—teleport back to town to heal before continuing to the Saint Tonal mainland.
Board Saint Tonal Nation through the exclamation mark, engage in a story battle, recommended LV49—enemies are three monsters. Go to Saint Tonal City, to the Mirror Labyrinth at the upper left—investigate all mirrors in this labyrinth. After investigating the mirror at the very top, return to the mirror at the labyrinth entrance to trigger the altar plot.
Go to Saint Tonal City, to Left斯特 City, to Lightring City, to Obad City, to Saint Tonal City. Buy some healing potions, go to Left斯特 City—after the plot, enter the Ancestor Tower. Get Early Guard改 at the lower left outside the Ancestor Tower, then enter the tower. The path is winding—explore the Ancestor Tower everywhere until you find the exclamation mark, then go to the marked staircase to reach the story battle location.
Engage in a story battle at the altar inside 5F, recommended LV52—enemies are Natal and two ordinary warriors. Natal isn't strong, but the two ordinary warriors keep charging up for big moves—use Kas's Cancel to interrupt their charging. Kill the two minions first, then deal with Natal.
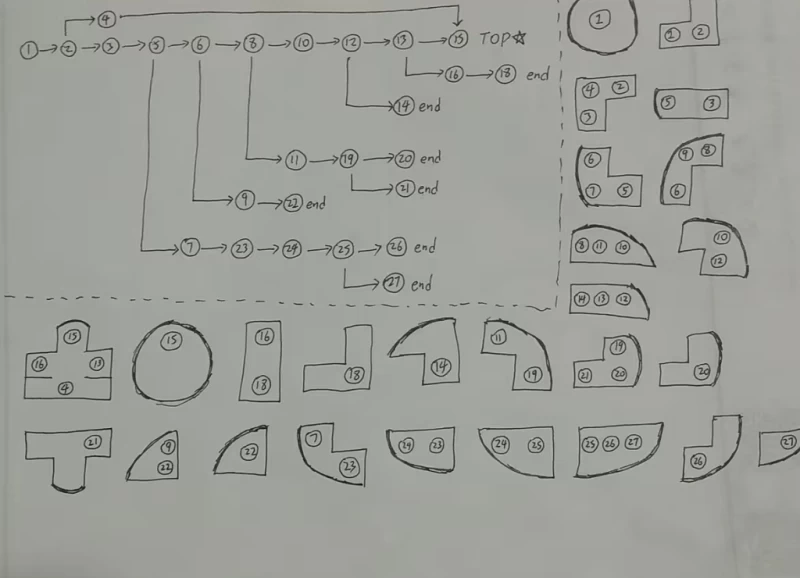
Ancestor Tower Map
Go to Saint Tonal City, to Lightring City—note the Croia NTR warning. Go to the Bride Tower to the right of Lightring City—engage in a story battle on the first floor of the Bride Tower, recommended LV56—enemies are one tank and two back-line mages. You must eat a BP potion and instantly kill the two back-line mages at the start, then slowly deal with the tank. Ensure you have two BP potions and two healing potions in your inventory.
Engage in a story battle on the second floor of the Bride Tower, recommended LV56—enemies are two high-evasion monsters, weak to light, can evade most damage including ultimate moves. Aster brings sure-hit skills, Riche brings light magic. Engage in a story battle on the third floor of the Bride Tower, recommended LV56—enemies are three Hani, Aster brings Hani Destroy, Ramius must use potions to keep HP above two-thirds, otherwise easy to be one-shot.
Heal at the spring at the lower part of the fourth floor of the Bride Tower, engage in a story battle on the fifth floor, recommended LV56—enemies are Araser and two minions. The minions will run away on their own and can be ignored. Araser is weak to light—Riche uses light magic. Araser frequently charges up for big moves, Kas must use Cancel to interrupt.
Go to Lightring City, to Obad City, to Saint Tonal City. Go to the portal to the left of Saint Tonal City, teleport to Battleship Degamma. Go straight through the corridor at the lower right, engage in two story battles at the lower left of the world map, recommended LV56—first wave enemies are three outlaws, second wave are five outlaws. Trigger the plot at the exclamation mark in front of the room.
Teleport back to Saint Tonal City, buy 4 BP potions, 3 healing potions, then grind some levels. Go straight through the corridor at the lower right to fight the Black Dragon Mirei preparing to ambush us, recommended LV57—ancient species. Aster uses Heart Steal while consuming BP potions throughout. Go to the iron door to the left of the portal—previously locked, it opens after defeating the black dragon. Enter through the left iron door from the entrance, engage in a story battle in front of the elevator, recommended LV58—three monsters. Go to the exclamation mark in front of the elevator, then engage in another story battle, recommended LV58—three monsters. After the battle, Ramius leaves the party and Teleport Magic becomes unusable.
The remaining four go to the room on the left for multiple story battles, recommended LV58—enemies are monsters, not high combat power, but you can't teleport to escape. Bring several healing potions to avoid dying from attrition. Riche brings ice magic, Aster brings sure-hit skills and Hani Destroy. Go to the exclamation mark on the left side of the room, then return to the elevator room—Ramius rejoins the party and Teleport Magic becomes usable again.
Engage in a boss battle in the small room above, recommended LV58—Ashval has become the Sloth Warrior Black Knight, a big tank that can even block magic attacks, which is purely disgusting. Bring many BP potions and healing potions, Aster uses Eight Dust改 to quickly resolve. Ensure you have 6 BP potions, take the elevator on the right to the second floor for a boss battle, recommended LV61—Felton has become the Pride Warrior White Knight, will sequentially deal 6666 damage to Riche, Kukrilla, Kas, Ramius, and Aster—if HP is insufficient, instant death. Don't delay, Aster consumes BP potions and keeps using Heart Steal for a forced kill, Ramius keeps using Gun Barrage to delay the boss's action order. Go to Saint Tonal City, to your home, Chapter 6 ends.
Chapter 6 Skill Chest Locations
Chapter 6 has 11 skill chests, located as follows:
1. Lightning Storm改 (Aster)
Located in the chest at the lower left corner of Miguel Mountain Cave at the upper right of Machimomo.
2. Armor Shatter Fist (Kukrila)
Located in the chest at the lower right corner of the Mirror Labyrinth.
3. HP Boost (Riche)
Located in the chest in a valley to the upper left of Left斯特 City.
4. White Destruction Beam (Riche)
Located in the chest in the Ancestor Tower.
5. Knight's Glory (Ramius)
Located in the chest in the Ancestor Tower.
6. Reversal Tactics (Kas)
Located in the chest in the Ancestor Tower.
7. Rising Slash改 (Aster)
Located in the chest above Lightring City.
8. Self-sacrifice Heavy Punch (Kukrila)
Located in the chest to the right of the nameless shrine above Lightring.
9. Recovery Rain (Riche)
Located in the chest at the lower left of the third floor in the Bride Tower.
10. Critical Preparation (Kukrila)
Located in the chest on the left side of the fifth floor in the Bride Tower.
11. Combo Rate Boost (Kukrila)
Located in the chest in the dark room of the Dragon's Food Storage—requires Aster to reach a certain level to open the dark room.
Chapter 7: Sky Island Walkthrough
Chapter 7 is the game's final chapter, requiring a very long grinding journey. First, go to the Ancestor Tower to capture Snow Girls—this type of female M can increase experience rate and is the best item for grinding players in the game. Although Happiness Bunnies and Plain Flutes can also boost experience rate, the latter two are basically impossible to farm. Chapter 7 requires a very long grinding journey, so have everyone equip Snow Girls, then go to the Red Tide area at sea—this is definitely the best leveling spot in the game. The Red Tide sea area is the fastest leveling area in the game—monsters in Sky Tower and Demon King Labyrinth are hard to beat and give little experience, making them poor value. Ramius brings Capture and Capture Technique, Kukrilla brings Mercy, Kas brings Mercy.
Go to Hamlet City, go to Camelot City to get Memory Share, go to your home. After the plot, use teleport skills to go to Sky Island, to Sky Tower. Engage in a story battle at the upper part of the second floor, recommended LV64—enemies are two Exeggutor sirs, weak to thunder. Go up from the second floor to the third floor, left from the third floor to the fourth floor, from the fourth floor take the lower left path to the lower right exclamation mark for a story battle, recommended LV65—enemies are two tanks and two supports, weak to ice.
Then go to the top floor for the boss battle, recommended LV67—Sethis has become the Wrath Monster. Normal attacks tickle, but damage explodes once entering rage state. Bring 4 BP potions, combine with Aster's Heart Steal, Riche's F Radiation, and Kukrilla's Self-sacrifice Heavy Punch for a forced kill. Equip Aster with Calm Slice to cancel Sethis's rage state.
Go to Eden City, to Camelot City, to Saint Tonal City. Go to Eden City, to Lancelot City, to Elgicod City, to Humpdy City, to Saint Tonal City. After the plot, sail to the Demon King's Right Hand on the sea—Eden Port at the upper left of Eden City can now be used for sailing. It's recommended to complete all side quests during this time, equip full endgame gear, and after completing Croia's third wife event, unlock Aster's second item slot.
Put 4 healing potions in your inventory, go to the innermost ruins of the Demon King's Labyrinth. Fight Roosevelt with Ramius at the upper left of the ruins, recommended LV70—enemy is the Jealousy Monster. Fight Rocinante with Riche at the upper right, recommended LV70—enemy is the Greed Monster. Fight Zaba with Kas at the lower left, recommended LV70—enemy is the Gluttony Monster—Kas must preserve BP to use Cancel to interrupt the boss's charging, otherwise you get eaten and it's an immediate failure. Fight Sethis with Kukrilla at the lower right, recommended LV70—enemy is the Wrath Monster—Aster must preserve BP and be ready to use Calm Slice at any time.
Then go to the innermost area to fight Demon King Felton, recommended LV80—bring 4 BP potions and healing potions. Aster brings Heart Steal, Ramius brings Gun Barrage, Riche brings F Radiation and Super Fire Master, Kukrilla brings Self-sacrifice Heavy Punch, Kas brings BP Welfare, BP Fill, Emergency Treatment, and Reversal Tactics. After defeating Felton, Felton transforms into the Desire Monster. All party members are automatically healed to full HP in the second round, and another story battle begins. The game ends.
Chapter 7 Skill Chest Locations
Chapter 7 has 2 skill chests, located as follows:
1. Speed Boost (Kas)
Located in the chest at the upper right outside Sky Tower.
2. Super Fire Master (Riche)
Get the key at the upper left of Sethis's seat, then go to the iron door on the first floor of Sky Tower, open it and go to the chest at the upper left of the basement.
One day, Evenicle 1 protagonist Aster and Evenicle 2 protagonist Alec were chatting.
Aster said: My combat power is stronger than yours!
Alec said: You were NTRed by monsters, but I wasn't.
Aster said: I'm a dragon second generation!
Alec said: You were NTRed by monsters, but I wasn't.
Aster said: I've explored more worlds than you!
Alec said: You were NTRed by monsters, but I wasn't.
Aster said: Can we not mention the monster thing?
Alec said: I have more harem members than you, and I'm not affected by Eve's Commandments.
Aster fell silent.
Alec said: My country can exterminate monsters, while your country was almost exterminated by monsters.
Aster fell silent again.
Alec said: You didn't even hold the Level Shop lady's hand by the ending, but I married the Level Shop lady halfway through the story.
Aster said: Can we talk about something else?
Alec said: You can't cure diseases—when you teleported to my world, you almost died. You can't cook either—when your wife was wandering outside, I fed her. You fight monsters to make a living, but I already have a family business—I came out to do business and play on the side. You don't think you and I are the same, do you? No way, right? Oh, here's a postcard for you—if your wives ever get hero's disease, you can come to me for treatment, I promise I won't charge.
Aster was completely speechless.








Publish Comments