

Getting lost in the four ruin mazes of Dusk City? Can't seem to collect all 36 items no matter how hard you try? Stuck on delivery quests for the Witch? Missing materials for special weapon synthesis? Don't worry—this guide engraves every single item location into your brain. Follow the map routes once and you'll collect them all. Enough talk, let's get started.
Table of Contents
Core Game Mechanics & Item System
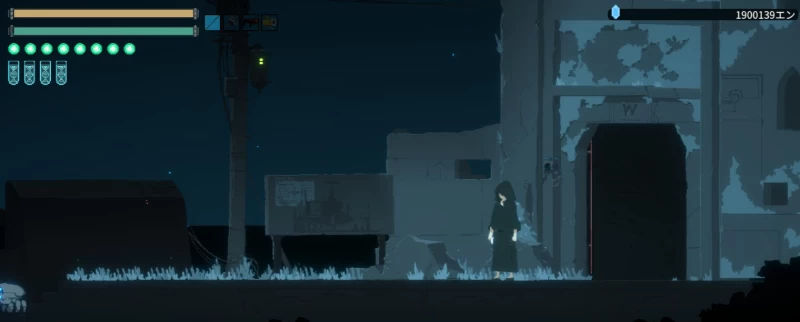
Note: The buildings in the two images below can be jumped on:
Dusk City is essentially a collection-driven action-adventure game. Four dungeons in the north, south, east, and west, each hiding a bunch of items—36 main items total waiting for you to rummage through. If you're short on cash, grind enemies. If you don't know the map, die a few times to memorize the routes. The core gameplay loop is: run through maps → collect junk → deliver items → get stronger → continue map running.
Items are divided into three categories: Consumables, Crafting Materials, and Key Quest Items. Consumables are bought directly from shops or vending machines, crafting materials are hidden in the nooks and crannies of the ruins, and quest items must be delivered to the Witch to unlock new abilities. Remember this logic and your collection efficiency will double.
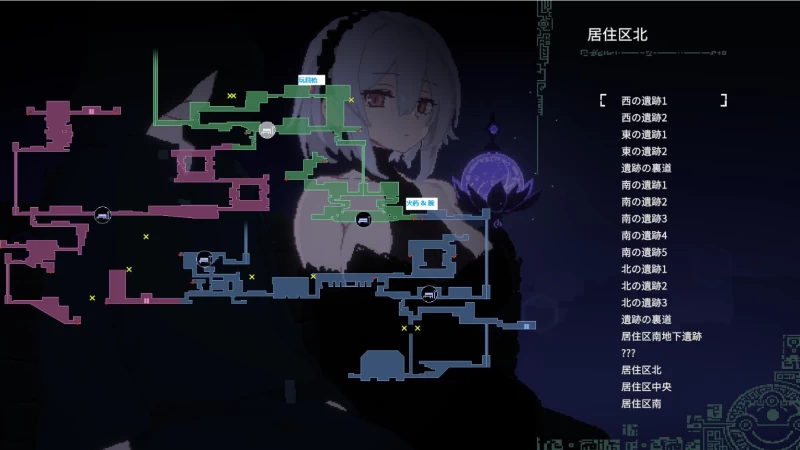
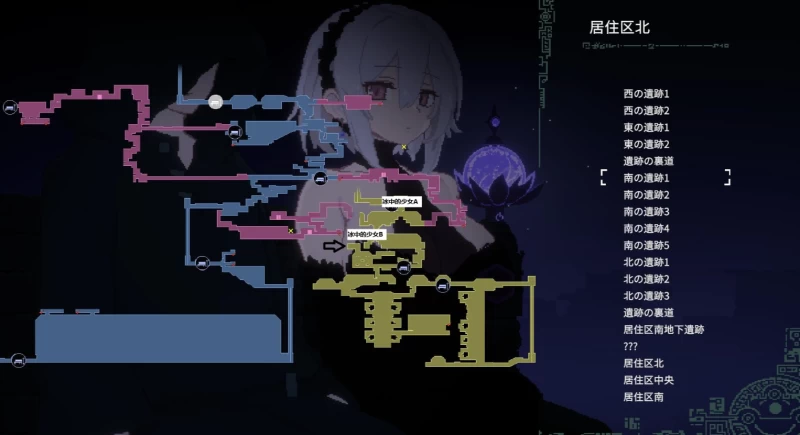
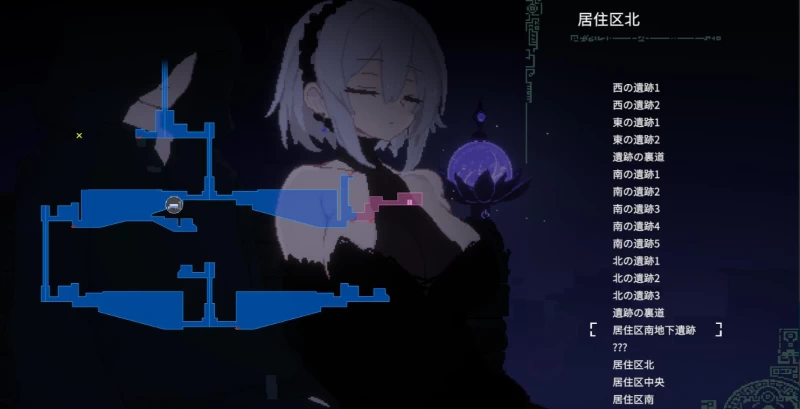
All 36 Items with Precise Coordinates
I've arranged these 36 items in acquisition order. Newbies should follow the numbers; veterans can just pick up what they're missing. The parentheses indicate purchase locations or specific position descriptions—if you can't find them, open the in-game map and look carefully.
Consumables (01-09):
01 Energy Drink Vending Machine (200 yen)
02 Rice Ball Set Central District Rice Ball Shop (650 yen)
03 Tonkotsu Ramen North District Izakaya (1,200 yen)
04 Spare Magazine Secondhand Shop, Vending Machine (400 yen)
05 Spare Magazine SP Secondhand Shop, Vending Machine (600 yen)
06 Spare Magazine SP-MAX Secondhand Shop, Vending Machine (800 yen)
07 Cordyceps Drink Vending Machine (650 yen)
08 Cordyceps Drink SP Vending Machine (1,200 yen)
09 Cordyceps Drink SP-MAX Vending Machine (1,500 yen)
Key Quest Items (10-21):
10 Flying Stone Obtained from the mole after rescuing it. (Give to Witch for Jump Boots)
11 Damaged Transport POD Treasure chest on the path between East Ruins 1-2. (Give to Witch for Shift Dash)
12 Ancient Fish Scales From South Ruins 4, head straight east to the treasure chest by the wall. (Give to Witch for Talisman)
13 Empty Bottle From West Ruins 1, head east to the deep treasure chest. (Don't take the elevator down)
14 Gunpowder From West Ruins 2, head east to the deep treasure chest.
15 Toy Gun Climb onto the high platform near West Ruins entrance, on the protruding wall in the top-right corner. (Requires: Jump Boots)
16 Ancient Drill Climb onto the top-left high platform in West Ruins 2, go to the deepest treasure chest. (Requires: Jump Boots)
17 Battery From East Ruins 2, go through the deep east door into "South Residential District Underground Ruins" to find the treasure chest.
18 Scrap Core From the top-right wall of the upper floor in East Ruins 2.
19 Scrap Eye Use the drill to destroy the wall below West Ruins 1. (Ruins Back Route)
Ruins Back Route (West & South) bench descent, then continue descending to the deep east elevator.
20 Ancient Book West treasure chest after entering South Residential District Underground Ruins
21 Violet Blue Defeat the final boss.
Crafting Materials & Hidden Items (22-36):
22 Final Weapon Schematic① From South Ruins 4, head straight east to the treasure chest.
23 Final Weapon Schematic② Use the drill to destroy the wall below West Ruins 1. (Ruins Back Route)
From Ruins Back Route (West & East), take the west elevator up, go through the gate into "Ruins Back Route (North & South)", go to the treasure chest under the bench.
24 Final Weapon Schematic③ Use the drill to destroy the bottom-left wall of East Ruins 1. (Ruins Back Route)
After entering the gate of Ruins Back Route (North & South), go to the far east corner.
25 Final Weapon Schematic④ From South Ruins 1, head deep east and use the drill to destroy the wall. (Ruins Back Route)
Continue to the deep east treasure chest.
26 Old Instrument Use the drill to destroy the bottom-left wall of East Ruins 1. (Ruins Back Route)
Move west from the middle of the vertical floor, then go to the top-right treasure chest in the enemy's passage.
27 Deep Sea Mud From the bottom treasure chest in South Ruins 2.
28 Seafood From South Ruins 2, use the drill on the east deep wall (between 1-3). (Ruins Back Route)
Continue to the deep east treasure chest.
29 Ancient Coffee Beans Use the spiral drill on the east wall of South Ruins 3.
Continue to the deep east (bottom-right) treasure chest.
30 Vintage Teacup From North Ruins 3, descend and go to the treasure chest on the east deep floor with the giant machine
31 Illusory Guitar Use the spiral drill on the bottom-left wall of East Ruins 1. (Ruins Back Route)
Continue deep west to reach the treasure chest.
32 Ancient Record Wall hole connecting the downward passage between South Ruins 1-3.
33 BL Book After entering South Residential District Underground Ruins, climb the east vertical wall using enemies.
34 Silver Block From South Ruins 3 deep east—specific location requires some jumping around to find.
============================================================
Complete Witch Item Delivery Guide
The Witch has four key quests. Delivering items grants permanent abilities—the highest priority, must be completed first.
1. Lantern Obtained directly from the Witch, location at West Ruins.
2. Jump Boots Unlocked after delivering Flying Stone to the Witch.
3. Transport POD Unlocked after delivering Damaged Transport POD to the Witch, grants Shift dash ability.
4. Endurance Talisman Unlocked after delivering Ancient Fish Scales to the Witch.
Remember the order: get Flying Stone first, then Damaged POD, then Ancient Fish Scales. Return to the Witch immediately after getting these three—don't delay, enjoy the benefits early.
MAX Equipment Acquisition Route
MAX series equipment is the best armor in the game, hidden in various weird locations. Below are the exact coordinates for all five parts.
Cape MAX:
From Ruins Back Route (West & East), take the west elevator up, go through the gate into "Ruins Back Route (North & South)", located in the treasure chest under the bench.
Generator MAX:
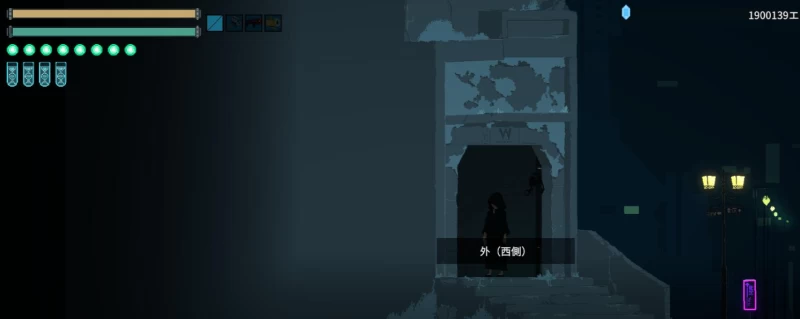
At the top of the central-west tower in the Residential Area (West Ruins entrance), it's the first scene when you enter the ruins from the right side of the central city area. That building can be jumped on—see image hints below.
Ventilator MAX:
From the east exit outside the Generator MAX location, hidden inside the machinery on top of the building—search carefully.
Tank MAX:
Located next to the西奥 building entrance in "South Residential District Underground", it's a bit dark but there's a treasure chest—bring a lantern.
Fuel Valve MAX:
Climb the taller tower next to the West Ruins entrance in "Outside: West". From here, jump ⇒ perform an air dash to just reach the西奥 small island. After entering the door, you can access "South Underground Ruins" and obtain the item from the treasure chest.
Four Special Weapon Crafting Recipes
Special weapons must be crafted manually at the workbench after gathering all materials. These four are the most practical damage-dealing tools in the game.
1. Grenade Empty Bottle + Gunpowder
2. Submachine Gun Scrap Arm + Toy Gun
3. Spiral Drill Battery + Scrap Core + Ancient Drill
Spiral Drill is the core tool for breaking hidden walls—craft this first.
4. Electric Laser Scrap Eye + Ancient Book + Violet Blue
This is the ultimate weapon with explosive damage, specifically for bosses.
Ruins Back Route Unlock Conditions
Many items are marked with (Ruins Back Route). This area isn't accessible from the start and requires specific conditions.
Unlock Method:
Must first obtain the Spiral Drill. Spiral Drill crafting requires three materials: Battery, Scrap Core, and Ancient Drill. After getting the drill, go to designated wall locations and press the attack button to break walls and access hidden areas.
Walls requiring drill destruction summary:
1. Directly below West Ruins 1 wall → leads to Scrap Eye
2. Below West Ruins 1 area → leads to Final Weapon Schematic②
3. Bottom-left wall of East Ruins 1 → leads to Final Weapon Schematic③ and Old Instrument
4. South Ruins 1 deep east → leads to Final Weapon Schematic④
5. South Ruins 2 east wall → leads to Seafood
6. South Ruins 3 east wall → leads to Ancient Coffee Beans
7. Bottom-left of East Ruins 1 → leads to Illusory Guitar
Remember, Ruins Back Route is a massive hidden map with many items. Recommend clearing it all at once to avoid missing anything.
Hidden Elements & Combat Tips
About Jumping and Climbing:
The game has several spots requiring enemies as stepping stones for high jumps, especially for the BL Book location. In South Residential District Underground Ruins east vertical wall, lure enemies to the wall edge, then jump on their heads.
About Money Grinding:
Short on cash early for drinks and magazines? Recommend grinding the coin-dropping mechanical monsters in East Ruins 1—most efficient.
Recommended Map Exploration Order:
Route: West Ruins for Flying Stone → Return for delivery, get Jump Boots → East Ruins for Damaged POD → Return for delivery, get Dash → South Ruins for Ancient Fish Scales → Return for delivery, get Talisman. Following this order gives you three movement abilities fastest, making subsequent map running super efficient.
About Final Weapons:
All four Final Weapon Schematics must be collected, plus other materials, to craft final equipment. After getting the drill, prioritize collecting all four schematics to avoid backtracking later.
About That Jumpable Building:
See image below—it's the central-west tower in the Residential Area that many players overlook. Jumping up reveals Generator MAX and Ventilator MAX, two top-tier equipment pieces.
Note: There are no special notes—just run through the entire map. The game is designed to encourage full exploration. Missing one corner might mean missing a key item.
I. Dusk City Save File Location Guide
Save file locations are a real headache—completely different depending on your system. Here's the breakdown by platform.
1.Windows 10/11 Save Path, typically at C:\Users\YourUsername\AppData\LocalLow\DeveloperEnglishName\DuskCity\ The AppData folder is hidden—you must enable "Show hidden files" in folder options to see it.
2.Steam Version Save Location, for Steam players, saves may be at C:\Program Files (x86)\Steam\userdata\YourSteamID\GameID\remote\ Don't mix up these numbers—finding your ID is key.
3.Quick Lazy Method to Find Saves, save in-game first, then search your computer by date using keywords savedata or save. You'll find it within five minutes.
4.Save Backup is Super Important, after finding the folder, copy the entire thing to D drive or USB. Always backup before installing patches, or you'll be crying when problems happen. Don't ask how I know.
II. Dusk City Patch Installation Tutorial
Patches look complicated but are super simple if you follow steps. Remember one principle: backup original files.
1.Download Patches from Reliable Sources, only use official channels or major forums. Don't randomly download from sketchy sites—easy to get viruses or bundled malware that'll make your computer run like crap.
2.Pre-Installation Prep, Completely close the game, including background processes. Find the game install directory, typically at C:\Program Files (x86)\DuskCity\ Copy this entire folder somewhere else—this is your "undo" button.
3.Detailed Patch Installation Steps, Extract the downloaded patch files (usually zip or rar format). You'll see several files after extraction—exe executables, dlls, and other formats. Select and copy ALL these files, Paste them into the game install directory. When prompted to replace files, select Yes. Some patches require running the exe file—double-click and follow prompts. Don't delete patch files after installation—you might need them later.
4.Post-Installation Checks, Reopen the game and check if the version number changed. Play for a few minutes to test if patch functions work properly. If crashes or errors occur, immediately copy your backup original files back to overwrite. This is why backing up is crucial.
III. Common Issues & Solutions
Finally, here are solutions to a few devastating common problems.
1.Saves Disappeared After Patching, copy your entire backed-up save folder back to the original location, overwriting the empty or new save folder. Restart the game and your progress returns. This is why save backups are critical.
2.Game Won't Start After Patching, 80% chance the patch version doesn't match the game version. Download the correct version patch, or restore your backed-up original files and find a matching patch.
3.How to Uninstall Patches, simply copy your backed-up original game folder back to overwrite. This is why I told you to backup—simple and brutally effective.
4.Multiple Patch Conflicts, install and test one patch at a time. Don't install all at once—if problems occur, you won't know which patch caused it. One by one is safest.
PS: The guide is clear—just follow it once instead of looking for shortcuts. Some hidden walls must be drilled open yourself for that sense of accomplishment.


Publish Comments