

Alright gamers, I'm walkthrough. I've banged my head against this game for countless hours and suffered more than enough deaths to fill a graveyard. Today, I'm dumping all these hard-earned lessons on you. Darkest Dungeon truly feels inhuman at times, yet utterly addictive once it clicks. Don't let my casual tone fool you—this brutal game made me want to smash my keyboard countless times. Eventually, I realized it's not that the game is unfair; you just haven't grasped its mechanics yet.
Table of Contents
I. Basics: Master These to Survive Week One
Darkest Dungeon, originally in English as *Darkest Dungeon*, is soaked in Lovecraftian horror. This game tests not just your tactics, but your mental fortitude and strategic planning. The hand-drawn gothic ink art style pulls you in at first glance and keeps you hooked after your first run.
The Quirk System is the #1 Newbie Killer
{Quirks} (Fig. 1) come in two flavors: positive and negative. They appear when leveling up or interacting with specific {curios}. Here's the kicker: the longer a quirk stays, the more gold it costs to remove—increasing exponentially. So don't hesitate to dismiss a hero early on if they roll bad quirks. The gold you save can fund two fresh recruits.
My three blood-soaked tips for beginners:
1. Dismiss heroes with negative speed or accuracy quirks in week one
2. Prioritize positive quirks that boost damage or speed
3. Don't plan to remove quirks later—you literally can't afford it
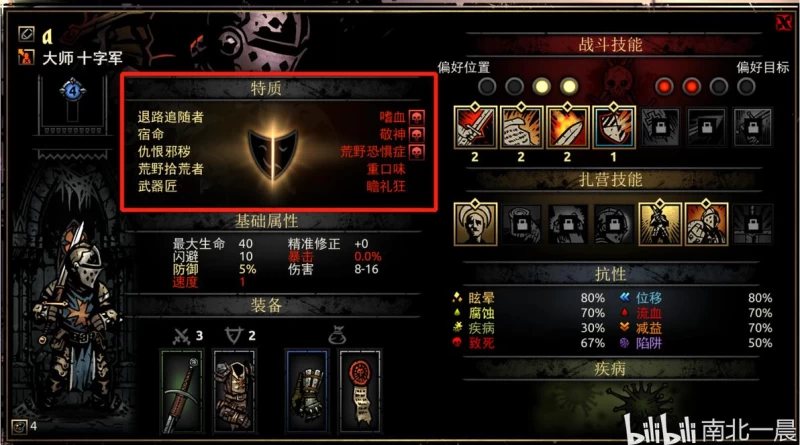
Fig. 1: Quirk System Interface
Stats & Equipment Determine How Far Your Party Goes
{Stats/Equipment} (Fig. 2) improves through three paths:
1. Equipment Quality: Red—Blue—Green—White. Better colors = better stats, and classes can only wear their specific gear types
2. Leveling Up: Each level grants small base stat increases—not much, but it adds up
3. Skill Buffs: Skills like the Highwayman's Tracking Shot give +12% damage, +6% accuracy, +4% crit—max these first
You can only equip two trinkets. Trinkets cannot be upgraded—repeat, cannot be upgraded. Say it three times. Weapons and armor are class-specific and upgraded at the Blacksmith for gold.
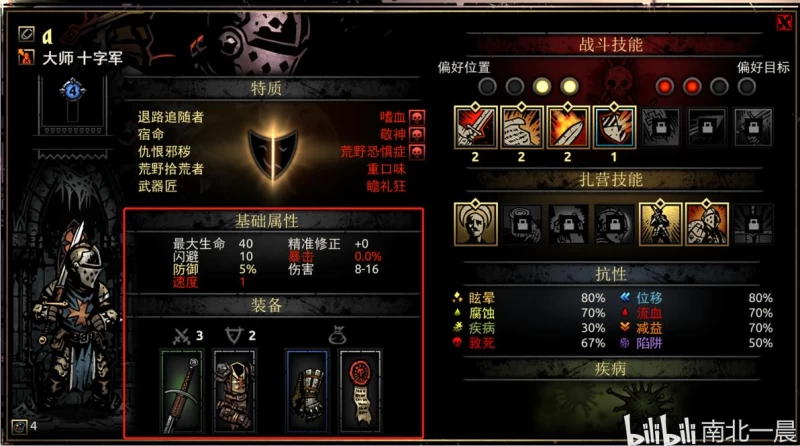
Fig. 2: Stats & Equipment Interface
Not Understanding Skill Mechanics = Wasted Efforts
{Skills} (Fig. 3.1, 3.2, 3.3) fall into two categories: Combat Skills and Camping Skills.
Combat Skills: You start with four random skills, learning more at the {Guild}. But you can only bring four skills into battle, so choose based on dungeon and party composition. Each skill has positioning requirements: yellow dots are where YOU can stand, red dots are enemy positions you can hit. Stand in the wrong spot and the skill blacks out.
Camping Skills: Unlocked around your fourth expedition. Use firewood (Fig. 3.4) to camp in rooms. Camping consumes food equal to party size. Run out of food and you'll bleed health and gain stress. Each camp grants 12 time points—skills consume points, and each skill can only be used ONCE per camp.
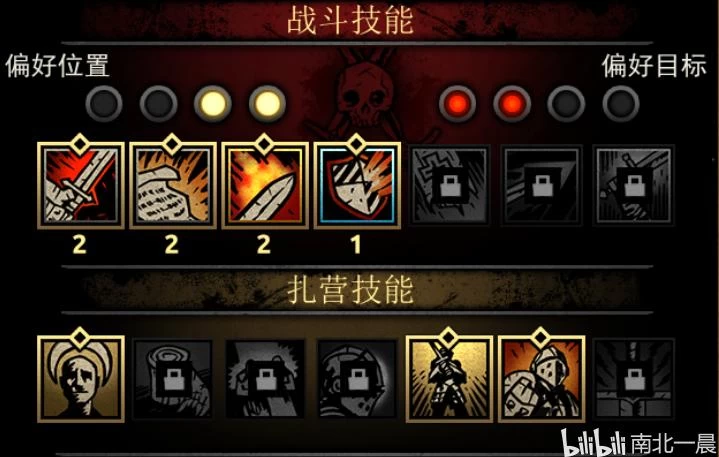
Fig. 3.1: Skill Interface Example 1
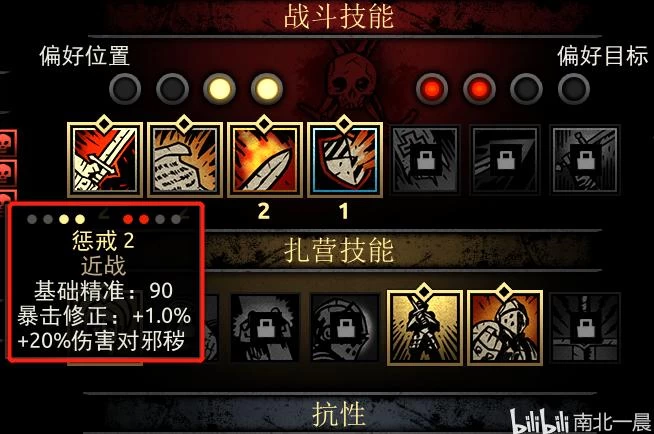
Fig. 3.2: Skill Positioning Guide
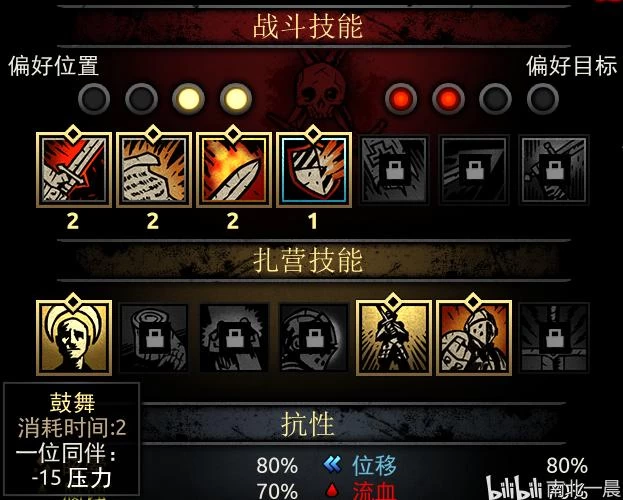
Fig. 3.3: Camping Skill Interface
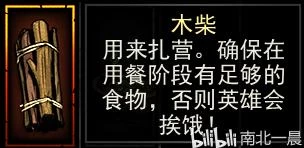
Fig. 3.4: Firewood Required for Camping
The Resistance System Hides Life-Saving Details
{Resistances} (Fig. 4) primarily improve through leveling and equipment.
1. Stun: Skips a turn, but consecutive hits on the same target build resistance (+50% first time, +100% second time). No infinite stun locks
2. Move: Getting shuffled or scared changes your position, potentially disabling skills
3. Blight/Bleed: Damage over time, stacks. Cure with antidote/bandage or wait it out
4. Disease: Stat penalties like bad quirks. Only curable at the Sanitarium, not in the field
5. Debuff: Temporary stat reductions in combat. Remove with medicinal herbs or wait for battle end
6. Death Blow: 0 HP doesn't mean instant death—you enter Death's Door. Higher Death Blow resistance = lower chance of dying
7. Traps: Shown on map, disarm chance displayed on hero HP bars. Traps remain hidden without {scouting}, so bring a hero with high scouting
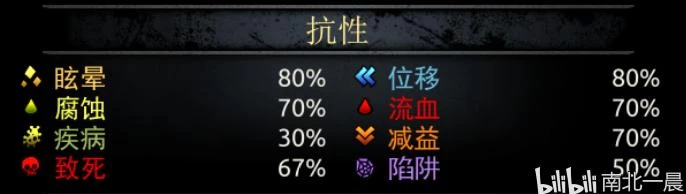
Fig. 4: Resistance System Details
Diseases Are the Straw That Breaks Your Party's Back
{Diseases} (Fig. 5) usually come from {curio} interactions or enemy abilities. Only treatable at the Sanitarium or preventable through disease resistance.
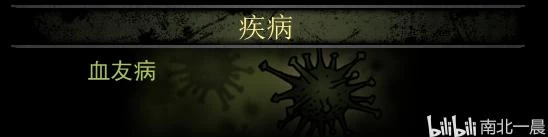
Fig. 5: Disease Treatment Interface
II. Buildings: Don't Waste Gold on the Wrong Upgrades
All buildings (except the Ancestor's Memoir) can be upgraded. Your upgrade priority determines your entire gameplay experience.
1. Stage Coach: Free hero recruitment. Hire and filter aggressively early game, don't be stingy
2. Blacksmith: Upgrades weapons and armor. Prioritize to level 3
3. Guild: Teaches combat skills. Core building, must upgrade
4. Survivalist: Teaches camping skills. Mid-game priority, not urgent early
5. Tavern/Abbey: Stress relief. Your lifeline in early game
6. Sanitarium: Locks positive quirks, removes negatives, cures diseases. Essential for late game
7. Graveyard: Where fallen heroes rest. Study their deaths and learn
8. Nomad Wagon: Buys trinkets. Don't impulse buy, choose carefully
9. Ancestor's Memoir: Pure lore entertainment, watch cutscenes
Building Layout Screenshot (Recommended Addition)
III. Stress & Light: The Real Bosses of This Game
The Stress and Light mechanics are the game's core systems and its most grueling features. Without understanding these, your party will wipe and you won't even know why.
The Stress System Will Drive You Insane
{Stress} (Fig. 6) caps at 200. Hit 100 and things go sideways.
Affliction Check: At 100 stress, heroes test for affliction or virtue.
Afflictions include:
1. Paranoid: Stresses the entire party—must isolate the carrier
2. Selfish: Uncontrollable, can't be healed, completely useless
3. Abusive: Attacks allies directly with high damage
Virtue Check: Rare chance, slightly higher for Scholar classes. Instantly reduces own stress and some party stress—cherish it when it happens.
200 Stress = Instant Heart Attack Death. No saves, no mercy.
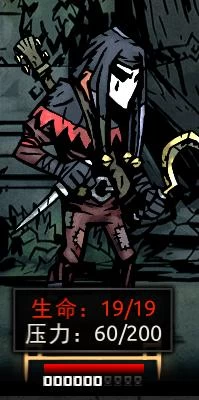
Fig. 6: Stress Bar and Affliction States
The Light System Affects Every Battle
Many players ignore Light's importance. The light meter ranges from 100 to 0, affecting:
• Enemy accuracy and crit chance
• Your party's stress accumulation
• Curio interaction outcomes
• Scouting chance
Keep light above 75. Use candles in critical moments. Darkness increases loot, but don't get greedy as a beginner.
IV. Curio Interactions: Saving Keys = Saving Lives
Everything interactable on the map is a {Curio}. There are two interaction types. Knowing what's worth touching and what to avoid saves heaps of bandages and herbs.
1. Direct Interaction: Crates, chests—just click them
2. Item Required: Interaction window appears (Fig. 7.2). Use the correct item for maximum rewards
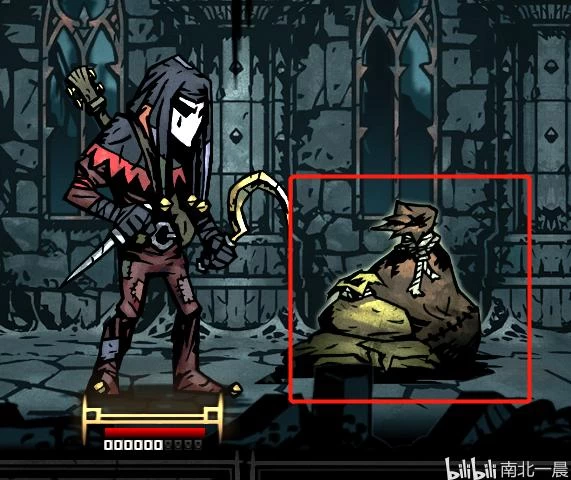
Fig. 7.1: Curios on the Map
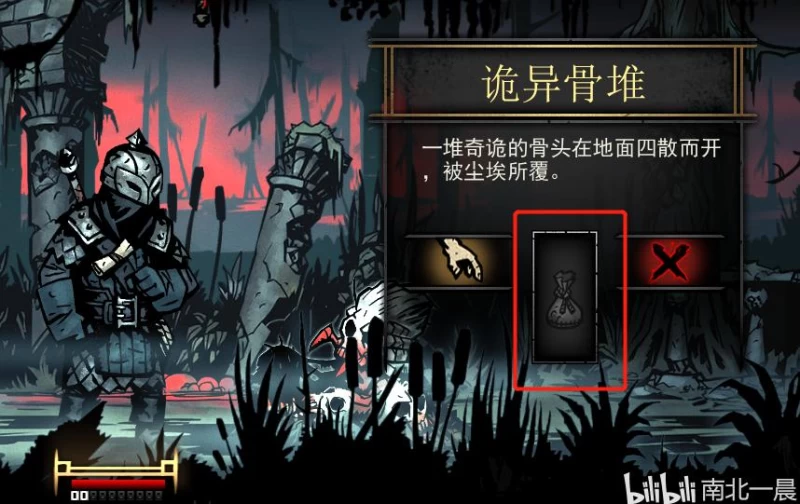
Fig. 7.2: Item-Required Interaction Window
Universal Curio Tips
• Bookshelf + Holy Water: High chance for Knowledge Scroll, -20 stress
• Altar + Medicinal Herbs: Clears negative status
• Skeleton + Bandage: Safe loot retrieval
• Torch + Key: Most efficient interaction
V. Region-Specific Curio Interaction Tables
Below is the most complete curio interaction table compiled by the expert "A型血红茶" (A-Type Blood Black Tea), originally from https://www.gamersky.com/handbook/201602/712715.shtml
{Ruins} Curio Interactions
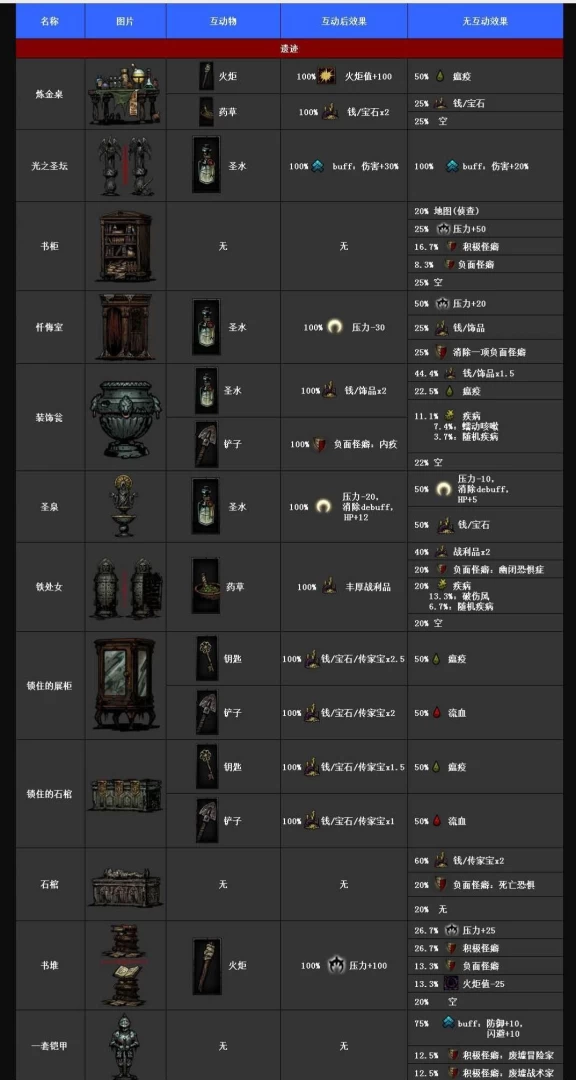
Fig. 8.1: Ruins Region Curio Interaction Table
{Weald} Curio Interactions
Fig. 8.2: Weald Region Curio Interaction Table (To Be Added)
{Cove} Curio Interactions
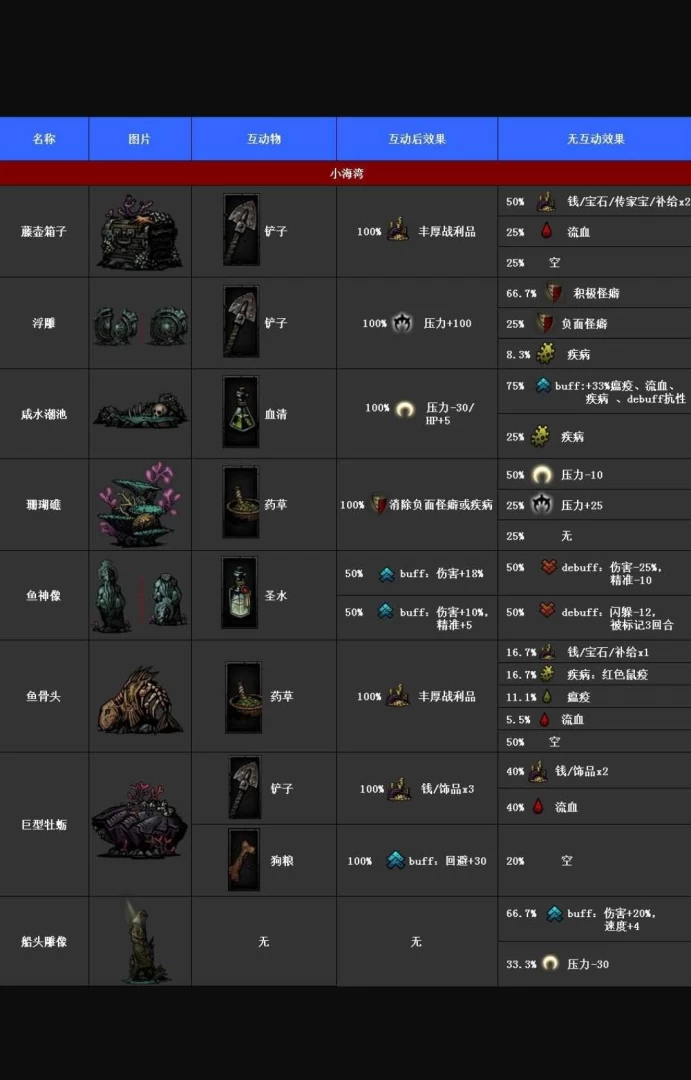
Fig. 8.3: Cove Region Curio Interaction Table
{Warrens} Curio Interactions
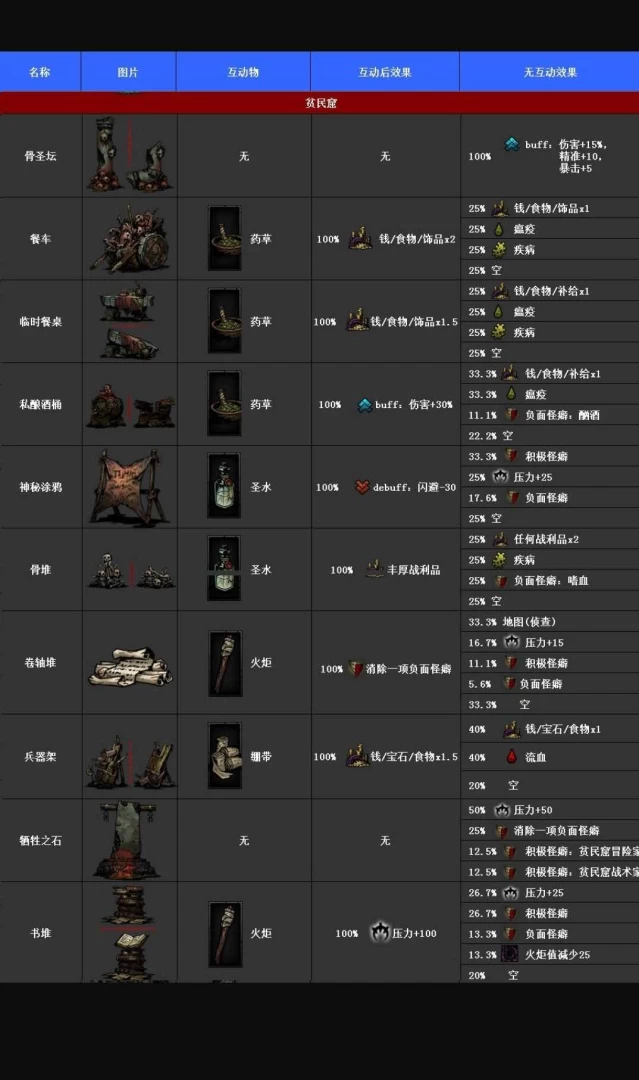
Fig. 8.4: Warrens Region Curio Interaction Table
{All Regions} Universal Curio Interactions
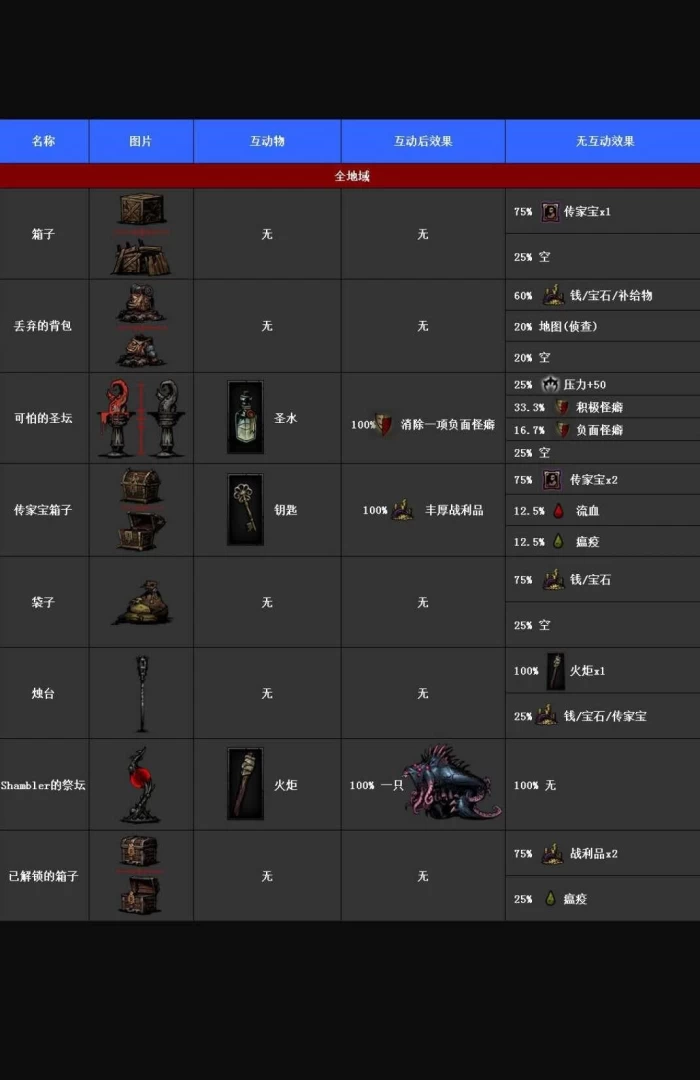
Fig. 8.5: Universal Curio Interaction Table
Disclaimer:
All guide content is original (curio tables reference the compilation by expert "A型血红茶"). Screenshots are from personal gameplay. Different versions, mods, or game updates may cause discrepancies—please verify with in-game situations.
Reproduction requires attribution and author credit: walkthrough
Last Updated: December 2025


Publish Comments