

Still tearing your hair out over Monster Princess Diano's card system? Don't know what to do with your 9 daily action points? Stats rising slower than a snail and achievements feeling forever out of reach? Don't panic—this guide will yank you from newbie to max-level veteran, teaching you step-by-step how to steamroll all achievements in the fewest days possible, making Octo-Sync launches more than just a dream.
The core concept is one sentence: Play cards, play cards relentlessly, play cards with scientific planning. After reading this, you'll unlock Octo on Day 8 and achieve 100% completion by Day 21, leaving the tsundere princess powerless in your hands.
Table of Contents
1. Quick Game Core Mechanics Overview
The full game title is "The Arrogant Monster Princess and the Detective Familiar", a masterpiece SLG with hilarious plot and top-tier animated CGs.
The core gameplay involves serving the cute yet arrogant heroine Diano while planning your own growth and unlocking achievements.


2. Optimal Action Point Allocation
First, a simple guide for those who want to experience the game solo~
♦ Action Points ♦
You get 9 action points daily for training, serving, conquering, production, and card play (yes, we'll call it card play from now on).
Action costs:
1. Training costs 3 AP to increase Attack and Defense;
2. Serving includes talk, chores, etc., costing 1-3 AP to raise Diano's affection and daily mood;
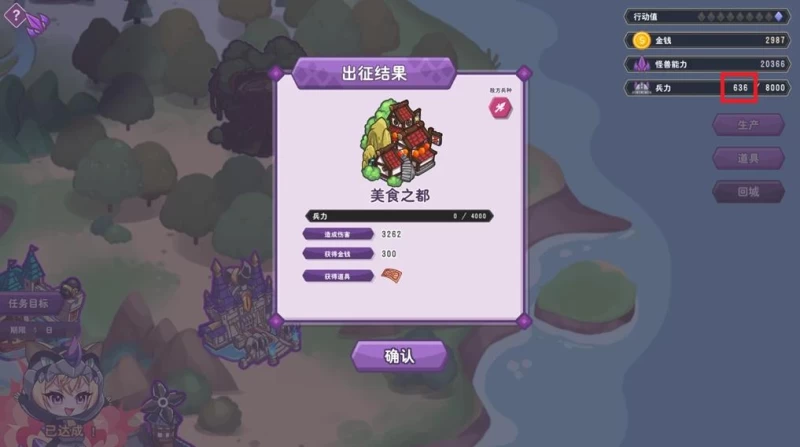
3. Conquering costs 2 AP to attack a region—conquer when enemies reach 0;
4. Exploring costs 2 AP to plunder conquered regions for gold, guaranteed drops, and chance drops;
5. Card Play consumes all remaining AP, converting it to stamina.
Stamina conversion rules:
1 AP remaining = 55% stamina
3 AP remaining = 66% stamina
6 AP remaining = 83% stamina
9 AP remaining = 100% stamina
Action benefits explained:
Card Play massively outperforms everything, providing huge Attack, Defense, and Affection gains. But it's not just button-mashing—you need to understand how to generate benefits and unlock achievement-based stamina caps to sustain card play.
Training is an option early when you don't understand card play, granting small Attack/Defense but is very inefficient. Mid-game stamina rises quickly through daily card play, so stop training.
Serving usually means Chores—the main early-game source of money and affection. You can also pick Talk for affection/mood.
Exploring is your primary money source. Exploring each map 5 times unlocks Diano's new outfits and story scenes, plus drops.
Production is how you create monster soldiers. Use this if you lack meal tickets.
Mid-to-late game strategy: 4 explores → 1 AP left → card play is most efficient. Default to exploring when unsure.
Production soldier counts are random, with up to double the variance. "Perfect" means you produced the maximum soldier count.
Here's the stat difference between training and card play on the same Day 6:


3. Five-Dimensional Attribute Deep Dive
♦ Attributes ♦
Next up: common SLG attributes:
1. Days determine game progression. Even if阶段性 goals are met, you must pass fixed days to advance story phases;
2. Mood refreshes daily, determining Diano's state during card play.
Higher mood = more progress per action, but don't grind it—resets to 20 the next day even at 100.
However, skipping card play lowers next day's mood, continuously dropping if you keep skipping. This may desync your rhythm, so try to card play daily for stable mood.
3. Affection triggers bond events and must reach thresholds before phase ends. Caps are fixed per phase and auto-unlock when the next phase begins;
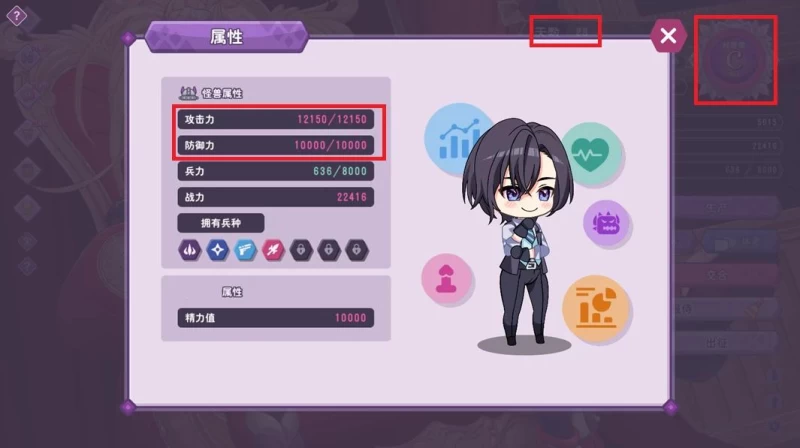
4. Attack & Defense determine monster soldier power. Like affection, they have fixed per-phase caps that auto-unlock next phase.
They do NOT increase infinitely. Gains beyond the cap won't apply—check the top-left for phase caps.
Since they unlock alongside affection, you can gauge phase progression by affection;
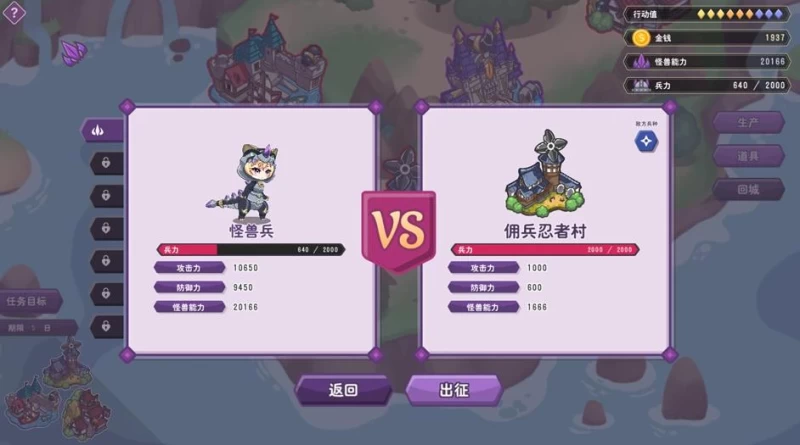
5. Combat Power determines casualties and damage;
6. Troop Count determines destruction scale per conquest.
Example: With 100 elite troops (max 1000 enemies/attack), you can conquer a 1000-enemy region in one battle, but a 2000-enemy region takes 2 battles.
If you produce 100 more troops, you win in one battle;
7. Stamina determines how many actions you can take during card play with Diano.

4. Complete Card Play System Guide
♦ Card Play ♦
Card play is the core mechanic. Launching Diano grants massive Attack, Defense, and Affection growth.
This action massively outperforms everything from start to finish, but that doesn't mean you can't do other actions—the game gives you plenty of time to leisurely experiment.
There's a preparation phase before card play where you can use items to help launch Diano more effectively.
Diano has four zones: M, B, C, V. You'll figure out what they correspond to—let's call them M-Zone, B-Zone, C-Zone, and V-Zone.
Usable items: Truffle, Pig's Feet, and Tongue. You know what they mean.
1. Truffle mainly goes to V-Zone. Without removing C-Zone defense, you can send it to C-Zone 7 times daily for huge C-Zone progress.
On the 7th C-Zone delivery, defense auto-removes and leaves spores—after this, truffles can only go to V-Zone.
Each V-Zone delivery grants slight C-Zone progress. Truffles have two modes: Shallow and Deep:
Shallow costs less stamina, adds 28% spore buildup
Deep costs more stamina, adds 48% spore buildup
For the Million Spores achievement, use minimal stamina for maximum spore releases—recommend Shallow-Shallow-Deep pattern.
If you can't be bothered, 4 Shallows also triggers one spore burst. Deep/Shallow affect V-Zone differently but identically affect C-Zone, so use Shallow for C-Zone development;
2. Pig's Feet mainly go to B-Zone and V-Zone. Prioritize B-Zone since V-Zone has truffle/spore achievements.
Of course, since truffles are stamina-heavy, use pig's feet to assist launches when stamina runs low;
3. Tongue mainly goes to M-Zone. Can go to B-Zone for moisture, but since M-Zone only accepts tongue, that's where it usually goes;
4. Sugar Bean is a legendary item appearing in the shop at Day 40. It quickly resolves C-Zone progress/achievements with minimal cost.
Usually used on C-Zone to complete the hardest Tyrant Slayer achievement.
Card play's primary goal is completing achievements for their massive rewards; secondary is grinding the three stats (which fill easily anyway).
Only by completing stamina cap achievements can you sustain better grinding, so focus on achievements first.
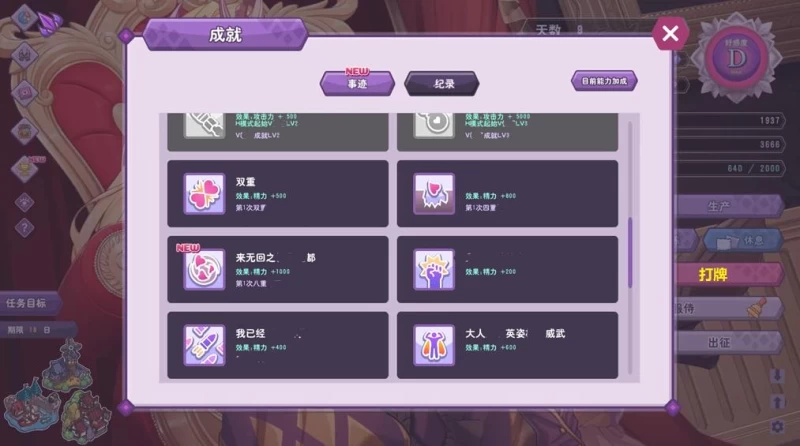
Click the trophy icon top-left to see all achievement conditions and rewards. Plan your card play strategy based on difficulty.
5. Achievement Route Priority
♦ ♦ Achievements ♦ ♦
We start very weak, running out of stamina after a few rounds. Hard achievements like C-Zone development, Quad, Octo, Tyrant Slayer can't be completed until stamina is sufficient, so stamina cap boosts are top priority.
1. M/B/C/V Zone Level Achievements:
Each zone has 3 achievements. M-Zone and V-Zone grant 100, 500, 5000 Attack.
B-Zone and C-Zone grant 100, 500, 5000 Defense—absolutely insane, and these are Attack/Defense beyond the normal caps.
Tier 1: Launch the zone once. Tier 2: Launch 10 times. Tier 3: Launch 30 times.
C-Zone is tough pre-Sugar Bean—mainly progress via daily truffle deliveries without removing defense, then send truffles to V-Zone to attempt C-Zone launches.
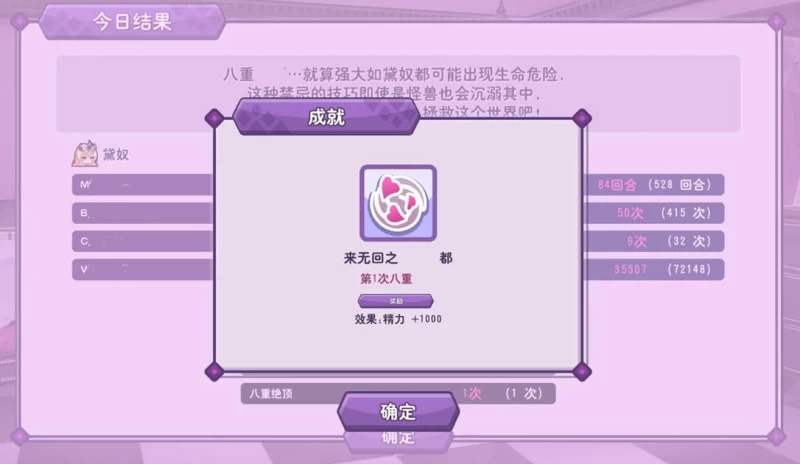
2. Dual, Quad, Octo:
Reward 500, 800, 1000 stamina respectively.
Dual = launch 2 zones simultaneously. Quad = 3 zones. Octo = 4 zones.
These get searched a lot—Quad/Octo methods covered separately. Dual is doable Day 2; Quad needs some stamina grinding;
3. Release Count: 2, 10, 20, 100 releases grant 200, 400, 600, 1000 stamina.
This is why we recommend Shallow-Shallow-Deep for multiple spore releases;
4. Spore Count: 1k, 10k, 100k, 1M spores grant 200, 400, 600, 1000 stamina.
Harder than release count. The final 1M spores is an early-game grind. Can wait for Day 28 shop unlock of Big Boomshroom for double spore production;
5. 120% Sync Rate: Launch simultaneously with Diano. Doable from start: Attack M-Zone 17 times → Shallow-Shallow-Deep. Reward: 500 stamina.
6. KISS: Kiss Diano 10, 100, 365 times for 200, 600, 1000 stamina.
Since tongue is low stamina cost, this is highly recommended early for massive stamina while also launching M-Zone for Attack/Defense/Affection.
6. Quad/Octo Sync Crushing Techniques
♦ ♦ Quad & Octo Operations ♦ ♦
Quad and Octo require sufficient stamina caps. Usually Quad means M+B+V sync; Octo means all four zones.
Basic card play mechanics:
1. Tongue and Pig's Feet deliveries don't auto-stop—they keep filling even when you're doing other actions;
2. To stop a delivery, click its icon top-right, then click an empty area;
3. Truffle delivery stops after spore burst, so it's usually the smooth finisher for multi-zone combos;
4. Switch truffle Shallow/Deep mode by clicking the icon directly (no need to wait for the expand menu). This enables smooth Shallow-Shallow-Deep with zero time loss;
5. Shallow-Shallow-Deep = 1 spore burst. 4 Shallows = 1 spore burst. Use Shallow-Shallow-Deep for spore achievements, 4 Shallows for C-Zone tasks;
6. Don't remove armor at start—use truffles to poke C-Zone 7 times. This is the main early C-Zone development method;
7. When B-Zone and V-Zone levels are equal, dual Pig's Feet + single Shallow Truffle makes B and V fill perfectly in sync for repeated Dual launches.
Based on the above, here are Dual, Quad, and Octo methods:
1. Dual: Usually M+B. First save and test solo launch counts for M and B.
If M needs 18 launches and B needs 24, then 24-18=6. Do 6 B attacks, leave Pig's Feet on B, then Tongue M 18 times for M+B Dual.
2. Quad: Usually M+B+V sync. Since V-Zone is easy to fill, test and attack V first to just before its pre-launch spore burst.
Then use Dual method for M+B, finishing with truffle for Quad.
If M=18, B=24, V=10 Shallows to launch: First do 2x4 Shallows on V (2 spore bursts), leaving V 2 Shallows short.
Now M18 B24 V2. 24-18=6, 18-2=16. So 6 B attacks, 16 M attacks, finish with 2 Shallows for Quad.
3. Octo: Adds C-Zone to Quad. If you have Sugar Beans (Day 40+), just use them on C-Zone with Quad method.
If attempting Octo early: M and B are fixed—repeat Quad method. The key is syncing C and V launches.
Use method #6 above to stack C-Zone, then adjust Shallow/Deep counts (they affect C equally but V differently) to make V lap ahead before both finish simultaneously.
Easy to test; then repeat Quad method.
♦ Closing ♦
That's everything for Arrogant Monster Princess. Hope you enjoy your time with Diano.
7. Fastest Octo Days 0-40 Detailed Walkthrough
Below is the fastest Octo development route, achieving Octo before the Day 8 merchant, completing all achievements except Tyrant Slayer by Day 21, achieving total stat supremacy.
First, some clarifications:
1. To prevent mistakes, B-Zone always uses one hand. "6B" means one-hand attack B-Zone 6 times.
2. "6B-18M" means click B-Zone 6 times, then M-Zone 18 times. While clicking M, B development doesn't stop, achieving 18 M launches + 24 B launches = Dual.
The non-stop property is key for pre-cap multi-zone syncing. Only clicking the icon top-right then an empty area stops a part.
The only exception: truffle stops immediately after spore burst, so it's usually the multi-zone finisher.
3. "7C" means sending truffle 7 times without removing armor. This can only be done once daily, visibly boosting C-Zone—main early C-Zone development.
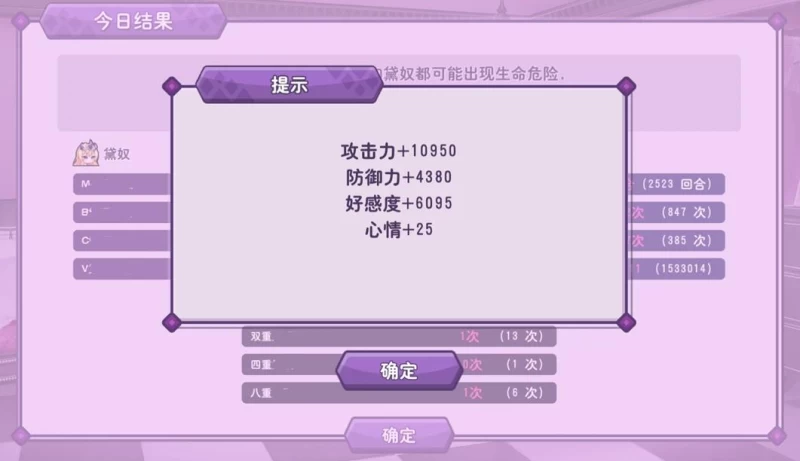
4. Any zone bar filling once = Diano launched once. Only launching Diano grants the three stat rewards, unrelated to your climax. Multi-zone rewards are geometric multiples of single-zone.
5. Only the first 8 days are critical for rapid stamina growth. After Day 8, stamina is abundant and mistakes are forgiving.
Day 0: Shallow-Shallow-Deep, Shallow-Shallow-Deep, Shallow-—Achievements: 2 Bursts, 1k Spores +200+200
Day 1: Straight to card play, 17M-Shallow-Shallow-Deep—Achievements: M1, K10, Sync +200+500
Day 2: Straight to card play, 6B-18M-Remove B-M until stamina depletes—Achievements: B1, Dual +500
Day 3: Straight to card play, M until stamina depletes—Achievement: K100 +600
Day 4: Straight to card play, Shallow-Shallow-Deep until stamina depletes—Achievements: V1, 10 Bursts, 10k Spores +400+400
Day 5: Straight to card play, 7C-4 Shallows once-Shallow-Shallow-Deep until stamina depletes—Achievements: C1, 20 Bursts +600
Day 6: Straight to card play, 4 Shallows 2x-5B-15M-Shallow-Shallow-Deep (Quad)-Remove all-Solo M until stamina depletes—Achievements: M2, Quad +800
Day 7: Straight to card play, M until stamina depletes—Achievement: K365 (Extreme!) +1000

Day 8: 7C-Deep-Deep-Deep 5x-Shallow-Shallow-Deep 2x-6B-14M-Shallow (Octo)—Achievement: Octo +1000 (Minor adjustments needed based on daily mood. I had 21 mood, can微调 B/M counts. Octo is definitely achievable)
Day 9: 7C-Shallow-Shallow-Deep until ~10 stamina-4 Shallows until depletion—Launches C-Zone 2x (Total: 4)—Achievement: V2, 100k Spores +600
Day 10: Shallow-Shallow-Deep to 1%-Deep until depletion—Need 20 more
Day 11: 7C-Shallow-Shallow-Deep until C-Zone launches 2x (remove after final burst)-M until depletion—Achievement: V3, 100 Bursts +1000
Day 12: 7C-Shallow-Shallow-Deep until C-Zone launches 2x (remove after final burst)-M-Zone 2x-B-Zone 1x—Achievements: M3, C2
Day 13: B until depletion (17)—Achievement: B2
Day 14: B until depletion (31)—Achievement: B3
Only C3, 1M Spores, and Tyrant Slayer remain. You're now completely dominant—play casually while waiting for Big Boomshroom and Sugar Beans, or keep grinding.
Day 15: 7C-4 Shallows-Shallow-Shallow-Deep until depletion—Launches C-Zone 3x
Day 16: Shallow-Shallow-Deep = 126k spores. 4 Shallows = 114k spores. Either works now.
Next few days: 7C → truffle spam for 1M spores. Recommend 7C→4 Shallows for simplicity.
Day 19: 7C-4 Shallows until depletion—Achievement: 1M Spores +1000 (C-Zone needs 5 more Tier 3 launches—2 days of 7C→4 Shallows)
Day 21: 7C-4 Shallows until depletion—Achievement: C3 (Only Tyrant Slayer remains)
Day 22: 1 attack to clear Ninja Village, 1 attack to clear Merchant District, 2 attacks to clear Gourmet Capital
(4 troops lost after clearing 3 cities)
Days 23-25: Explore Gourmet Capital first. Buy Treasure Detector from shop on Day 25 to increase exploration income.
Day 26: After getting all outfits, permanently explore Gourmet Capital for money to buy items.
Now all regions are Tier 3, enabling stable Octo. Use the dual-hands + truffle sync property to farm Dual launches post-Oct.
Remember the Octo formula to max stats/affection in one day—the geometric multiplier from Octo is insane.
Day 27: Explore 4x → Card Play: 7C-8 Deep-5 Shallows (now 1 Shallow short of CV Dual)-4B-13M-1 Shallow (Octo)-Dual Hands-BV Dual
Cap release day: Max stats/affection with 1 stamina. This is Octo's true value.

8. Mid-Game Growth & Shop Strategy
Day 28: Shop refreshes. Golden Finger, Desperate Survival Book, and Monster Soldier Manual are priority purchases.
Day 32: Production for perfect +4000 troops. 2 attacks to clear Forest, 1 exploration.
Day 33: From now on: 4 Forest explorations + 1 stamina serving to maintain mood. Farm meal tickets until troops are maxed.
Day 39: Troops should be maxed now. Explore 4x → Card Play: 7C-8 Deep-5 Shallows (1 Shallow short of CV Dual)-4B-13M-1 Shallow (Octo)-Dual Hands-BV Dual-Remove all-M until depletion.
Cap release day: Instantly max stats/affection with 1 stamina.
Day 40: Shop unlocks Sugar Beans (Tyrant Slayer). Buy immediately. Explore 4x → Card Play, use Sugar Bean on C-Zone, slay the tyrant, get full completion~
Day 41+: No more guide needed. 4 explores + 1 card play daily. Clear the shop. Enjoy life.

END


Publish Comments